Difficulty: ★★☆☆☆
What is SAMBA
Samba is the standard Windows interoperability suite of programs for Linux and Unix.
What can you learn from this?
This document from my notepad is intended as a help to setup simple client connection to home NAS and simple file sharing from your Manjaro desktop to other computers in your home network. If you are looking for domain specific setup and integration to Microsoft AD you must refer to the official samba documentation [1].
Occasional sharing
Python http.server
If you only occasionally need to serve files - you can do so using the default Python installation.
Copy the files to you want to share to ~/Public then open a terminal in the folder and run two commands.
The first displays your IP address using an utility script. Example
~/Public $ check-network
192.168.1.20
The second run the http service exposing the content of your ~/Public folder
~/Public $ python -m http.server -d ~/Public  8080
Serving HTTP on 0.0.0.0 port 8080 (http://0.0.0.0:8080/) ...
Then share the IP and port. The person(s) can fetch the file(s) using their browser and navigating to - the slash at the end is important (otherwise the browser runs a search using the configured search engine)
http://$IPADDRESS:8080/
When you are finished sharing, close the terminal or press Ctrlc to stop sharing.
Simple http servers
Packages such as darkhttpd and caddy provides webservers to service static files and can be installed from the repo.
The caddy package also provides a SSL/TLS enabled server.
Samba Client
For simple client connection to shares provided by a NAS or maybe your router only a few packages are needed. The package smbclient provides the tools necessary for accessing samba fileshares.
There is several packages which builds upon the client and makes it easier to connect and automount a share from a file manager. Packages such as gvfs-smb and smb4k extends the file manager with seamless mount of Samba shares.
Ensure the packages are up-to-date by running below command in a terminal
sudo pacman -Syu smbclient gvfs gvfs-smb --needed
smbclient
Before attempting a connection either reboot your system or manually load the kernel module
sudo modprobe cifs
Also a configuration file /etc/samba/smb.conf must be present. The client doesn’t require any content - just the presence and can thus be created by the touch utility.
sudo mkdir /etc/samba
sudo touch /etc/samba/smb.conf
GVFS
Open your file manager and enter the server name or IP address in location bar.
If the location bar is not visible it is often activated using the hot key-combo CtrlL. Input the server name and share using the protocol format
smb://server-name/share
Some file managers (e.g. dolphin) can better deduct if credentials are required if the username is supplied like this
smb://username@server-name/share
When you are challenged for credentials input those to access the content. Do not save your credentials just yet. Later on you will return here to store the credentials in your keyring.
This method is using gvfs which creates the mountpoint in the /run tree and therefore the mount will not persist across reboot.
You can inspect the file structure by opening the folder matching the uid for your user. If you have a mounted share you can run ls on the gvfs folder - it will yield an output similar to below example
$ ls /run/user/$UID/gvfs
'smb-share:server=nas.net.nix.dk,share=data'
System Automount
systemd units
When mounting one or more network shares on boot one need to take into account when the network is up and connected - otherwise the system will hang for 90s for each share.
This can be done using fstab or using systemd units [ How to use systemd mount unit ] [ sample mount units ].
User Mount
As demonstrated, a file manager can utilize gvfs to create a user mounted samba share, and this knowledge can used in creating some automation.
As shown the gio mountpoint takes the following form where $UID, $HOST and $SHARE represents the variable factors
/run/user/$UID/gvfs/'smb-share:server=$HOST,share=$SHARE'
We will use the gio smb mount script to mount the share. Use the template provided in the topic to create your own script. When you have the script in place and working come back here.
The script asks for username, workgroup and password (unless configured otherwise) when you run it and that is fine for the occasional mount but you will likely want to automount the share when you log onto your system.
User Automount
The script can be executed at login in a number of ways - but remember - the script’s success depends on the credentials being available in your keyring.
- Adding the script to your environment’s autostart configuration
- Manually creating a desktop launcher in
~/.config/autorun
This topic will propose a somewhat different method by means of a systemd user service which will be used to execute our script upon login.
![]() To be able to automount the share you can
To be able to automount the share you can
Either
- Stored the credentials in your keyring when challenged by the file manager.
Or - Store the credentials in the mount script mentioned above
The user service
Create the folder ~/.config/systemd/user and create a service file named e.g. gio-smb-share-name.service - use the same name as the script you are calling - thus making the dependency obvious and simplify future maintenance.
mkdir -p ~/.config/systemd/user
touch ~/.config/systemd/user/gio-smb-share-name.service
Open the file in your favorite editor and paste below content.
[Unit]
Description=GIO mount smb share-name

[Service]
Type=oneshot
ExecStart=/home/%u/.local/bin/gio-smb-share-name.sh
ExecStop=/home/%u/.local/bin/gio-smb-share-name.sh -u
RemainAfterExit=true

[Install]
WantedBy=default.target
Watch your SMBLinks folder and start the service
systemctl --user start gio-smb-share-name.service
Note the symlink is created. Stop the service to watch the symlink disappear
systemctl --user stop gio-smb-share-name.service
When everything works - start and enable the user service
systemctl --user enable --now gio-smb-share-name.service
Manjaro Samba Server
Starting from Windows 10 1709, guest access in SMB2 and SMB3 may be disabled by default. This means that guest access from Windows 10 to a Samba share may not work, for more information, see here.
– https://wiki.samba.org/index.php/Setting_up_Samba_as_a_Standalone_Server
![]()
- Sharing data will open ports to the network.
- This is not unsafe if properly secured and protected.
- Only run a Samba file service on a trusted secure network or zone.
- Ensure firewalld is set up to only allow share traffic when connected to a trusted and secure network or zone.
- Never run a samba file server on a public network.
- Avoid NT1 aka SMB1 - it is unsafe and exploited by numerous ransomware projets.
Secure your service
if you are using another firewall service (e.g. ufw) either setup that service to allow samba and skip this step or stop and disable the service before continuing.
Install the package firewalld then enable and start the service.
sudo pacman -Syu firewalld
sudo systemctl enable --now firewalld
firewalld has some predefined zones which we will use for this purpose to define trusted and untrusted network. If a network is not defined in any zones it is treated as public which means visible on the network and no open ports
- home
- public
When you are connected to what you deem a trusted and secure network run the following command
nmcli device show | grep IP4.ROUTE
IP4.ROUTE[1]:             dst = 192.168.1.0/24, nh = 0.0.0.0, mt = 100
IP4.ROUTE[2]:             dst = 0.0.0.0/0, nh = 192.168.1.1, mt = 100
In this example note the first destination network; 192.168.1.0/24. This it a common network used by many home routers. Your result may be different - adjust accordingly.
Before you begin - list the default services permanently enabled for the zones
sudo firewall-cmd --permanent --zone="home" --list-services
sudo firewall-cmd --permanent --zone="public" --list-services
Next step is to to tell the firewall this network is trusted - replace the variable with your network (note it is possible to have more than one trusted network - eg. home and work)
sudo firewall-cmd --permanent --zone="home" --add-source="$NETWORK"
Using the example using above (remember - your network may not be the same)
sudo firewall-cmd --permanent --zone="home" --add-source="192.168.1.0/24"
Next we define the policy for the samba service
sudo firewall-cmd --permanent --zone="home" --add-service="samba"
With the security in place proceed to installing and configuring Samba
Install samba package
Install the samba package and ensure your system is fully updated in the process.
sudo pacman -Syu samba
Basic Server configuration
Create the configuration file /etc/samba/smb.conf - the folder may need to be created beforehand.
sudo mkdir -p /etc/samba
sudo touch /etc/samba/smb.conf
Edit the file - using superuser privilige - insert below content and save the file (need superuser). If you are connecting an existing network of servers change the WORKGROUP to match the existing network.
[global]
   workgroup = MANJARO
   server string = Manjaro Samba Server
   server role = standalone server
   log file = /var/log/samba/log.%m
   max log size = 50
   guest account = nobody
   map to guest = Bad Password

   min protocol = SMB2
   max protocol = SMB3

[public]
   path = /srv/samba/share-name
   public = yes
   writable = yes
   printable = no
Test your config
sudo testparm /etc/samba/smb.conf
Create share and set permissions
To share e.g. removable devices you need to mount the devices.
This is best done using using systemd mount and if removable create both mount and automount unit.
[root tip] [How To] Use systemd to mount ANY device
Create the shared folder
sudo mkdir -p /srv/samba/share-name
Set permissions to any and all
sudo chmod -R ugo+rw /srv/samba/share-name
Start the services
sudo systemctl enable --now smb nmb
Enable Usershares
This section is an almost word-to-word replication from the ArchWiki
Note: This is an optional feature. Skip this section if you do not need it.
Usershares is a feature that gives non-root users the capability to add, modify, and delete their own share definitions. See smb.conf(5)
– Samba - ArchWiki
Before enabling usershares you must create the folder, group, set correct permissions and add a section to your smb.conf. Any local user allowed to share own data must be added to the group created.
Steps
- Create the folder
sudo mkdir -p /var/lib/samba/usershares - Create a system user group
sudo groupadd -r sambashare - Set folder owner
sudo chown root:sambashare /var/lib/samba/usershares - Set correct permissions (you won’t allow users to delete shares created by other users)
sudo chmod 1770 /var/lib/samba/usershares - Add configuration to smb.conf
Test your configuration[global] usershare path = /var/lib/samba/usershares usershare max shares = 100 usershare allow guests = yes usershare owner only = yessudo testparm /etc/samba/smb.conf - Add your user (you may add other local users if desired) - replace $USER
sudo gpasswd sambashare -a $USER - Restart your services
sudo systemctl restart smb nmb - Log out and log back in - to activate your group membership
Service Visibility
To make server visible on the network you need the avahi package synced and services enabled and running. Network Manager depends on Avahi so on Manjaro it is installed but not enabled.
Enable the service on the server using command (provide password when challenged) or use sudo
sudo systemctl enable avahi-daemon.service avahi-daemon.socket
Troubleshooting
Did you remember to add users to the service?
Samba users must exist as a system user before using smbpasswd
sudo smbpasswd -a $USERNAME
Samba documentation on https://www.samba.org/samba/docs/current/man-html/smbpasswd.8.html
Filemanagers
Some file managers implement a Go → Network option.
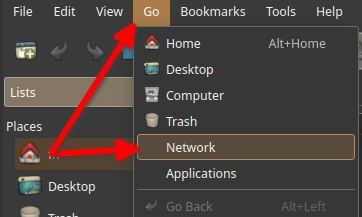
To make this option usable you need the avahi package synced and services enabled and running. Network Manager depends on Avahi so on Manjaro it is installed but not enabled.
Enable the service on the client using command (provide password when challenged) or use sudo
sudo systemctl enable avahi-daemon.service avahi-daemon.socket avahi-dnsconfd.
Access Control Lists aka ACL
Missing r/w access due to permissions. In essence, it was similar to this issue. Simple solution is to remove your share and create it again. And no need to change tdbsam to smbpasswd. – Credit @openminded
AppArmor when serving samba shares
Some editions of Manjaro comes with AppArmor enabled (snap support) which may lead to issues when samba is updated.
In such case you can use the following quick fix
sudo aa-complain /etc/apparmor.d/usr.sbin.smbd
Now proceed to reading documentation on AppArmor especially the section on editing AppArmor profiles for a better and more long-term solution. – Credit @openminded
On 2022-09-02T22:00:00Z @0xbeaf contributed this comment on another topic and has been added here to complement this section.
Click to unfold the complete quote
- Changes to how
sambadoes rpc seems to be the main culprit. Since it is using multiple new executable files to delegate its jobs, new profiles and overrides forapparmorneeds to be added.- I had to add override rules for
usr.sbin.smbd,samba-dcerpcd,samba-rpcdandsamba-rpcd-classic.- To get rid of all DENIED error messages in
apparmorlog, I had to add one more entity to profile rules. E.g. to whitelist the path/tank/anbaar, I added the following to all above-mentioned profiles in/etc/apparmor.d/local:/tank/anbaar lrwk, /tank/anbaar/ lrwk, /tank/anbaar/** lrwk,
- Additionally,
/usr/share/sambaand/var/cache/sambahad to be whitelisted forsamba-rpcdsoavahiservice could properly work with a macOS machine so that it could automatically find and mount the TimeMachine share-points!!!Helpful links:
On 2022-10-05T22:00:00Z it is suggested to apply the following configuration to apparmor - credit @jrichard326
sudo aa-complain /usr/bin/smbd
sudo aa-complain samba-dcerpcd samba-bgqd samba-rpcd samba-rpcd-classic samba-rpcd-spoolss
Client
Samba client requires the file /etc/samba/smb.conf even if it is empty.
sudo mkdir -p /etc/samba
sudo touch /etc/samba/smb.conf
Browse available shares
It may not be possible to browse shares by using the service name
SMB1 has been removed for security reasons. This also removed the possibliity to browse a server for avaliable shares.
The removal enhances the resistance against ransomware and other malware propagating over the network.
 $ smbclient -L {host|ip} -U%

        Sharename       Type      Comment
        ---------       ----      -------
        public          Disk
        IPC$            IPC       IPC Service (Manjaro Samba Server)
SMB1 disabled -- no workgroup available
Netbios requests has been disabled due to the vulnerabilities thus highly improving resistance against ransomware abusing the service to spread itself.
Always connect to the share directly
smbclient //{host|ip}/public
Using a file manager you may need to add username to the request e.g. smb://username@service/sharename and provide the password. Only then you will be able to see what other shares the service provides.
Initial share lookup
If you find browsing the network from your file manager is not possible issues it may be helpful to add the following content - replace the WORKGROUP with your computer name or another identifying name
[global]
    workgroup = WORKGROUP
You may get messages like
Failed to retrieve share list from server: No such file or directory
The specified location is not mounted
Samba protocol version
Upstream Samba disabled SMB1 due to a vulnerability exploited by a widespread ransomware. Yet many ISP provided routers has not been upgraded and you may have difficulties connecting the router’s samba service using a default samba client.
To gain access to such share you need to add a samba configuration which sole purpose is to enable the deprecated samba version. Add the following line in the [global] section of the configuration file
[global]
    client min protocol = NT1
Arch Wiki
The options
uidandgidcorresponds to the local (e.g. client) user/user group to have read/write access on the given path.Note:
- If the
uidandgidbeing used does not match the user of the server, theforceuidandforcegidoptions may be helpful. However note permissions assigned to a file whenforceuidorforcegidare in effect may not reflect the the real (server) permissions. See the File And Directory Ownership And Permissions section in mount.cifs(8) § FILE AND DIRECTORY OWNERSHIP AND PERMISSIONS for more information.- To mount a Windows share without authentication, use
"username=*".Warning: Using
uidand/orgidas mount options may cause I/O errors, it is recommended to set/check correct File permissions and attributes instead.
– Arch Wiki