Stability
The pinephone hardware itself is tried and tested hardware - rock solid.
The images is WIP and you should never expect it to work flawless.
Don’t complain but use the relevant bugtracker or forum threads to ask for help and be specific on how to reproduce the issue.
The convergence unit is an invaluable tool as it makes it possible to attach external keyboard and thus making terminal usage much - much easier.
Remember - the pinephone is an ARM based computer - and the terminal behaviour is comparable to your desktop system.
pacman and pacman-mirrors works as you are used to.
Be cautious
- The nano-to-micro sim adapter in the package is not a superfluous accessory.
- The sim reader is for micro sim - so if you have a nano sim - you will need it.
- The sim reader is the lower of the two slot - the upper slot is SD-card reader.
The pictograms showing sim/sd-card can be misunderstood - this will short you sim and cause irreparable damage to it. Because the nano sim is smaller than an SD card you will most likely bend the third leg in the reader - with a high probability of causing damage to the PCB and subsequently your SD-card.
So be sure to insert the cards in their appropriate slots.
- lower slot is micro sim slot
- upper slot is SD-card slot
So by now you will all know - I melted my sim and learned to take apart the pinephone and replace the pcb with a new undamaged counterpart.
Pinephone boot order
Pinephone boots from USB or SD if present - otherwise the eMMC. Due to the high number of writes rumors are SD-cards don’t last very long.
Note: While the device won’t boot using grub - an USB with a boot loader seems to halt the system start. Remove the USB from the convergence unit and restart the device.
The benefit of the device boot order is obvious - you can try out other images without actually flashing your phone - but don’t expect your SD-card to last for ever.
Testing images
Download the xz compressed image to your computer (links below) and unpack the image
~/Downloads $ ls
Manjaro-ARM-plasma-mobile-dev-pinephone-201124.img.xz
~/Downloads $ unxz Manjaro-ARM-plasma-mobile-dev-pinephone-201124.img.xz
~/Downloads $  ls
Manjaro-ARM-plasma-mobile-dev-pinephone-201124.img
Then use your favorite image writing tool - mine is mintstick - to write the image to the SD-card. You can also use dd but you must ensure all data is written before removing the card from your computer. Ensure you get the $IMAGE and $DEVICE right - replace with actual values from your use-case/system.
sudo dd if=$IMAGE of=$DEVICE status=progress bs=4k conv=noerror,fdatasync oflag=dsync
5091217408 bytes (5,1 GB, 4,7 GiB) copied, 1755 s, 2,9 MB/s
1243648+0 records in
1243648+0 records out
5093982208 bytes (5,1 GB, 4,7 GiB) copied, 1757,43 s, 2,9 MB/s
When the flashing is done and you have synced/ejected the card - remove back cover and battery. Insert the SD-card in the upper slot - attach the battery and press the power button to load the system from SD-card.
Using jumpdrive
jumpdrive is a special image designed to expose the unit’s storage devices.
Read more at Pine64 wiki by following this link. Download is found following this link.
When you connect your jumpdriven device it will create a new route on your system and this may change your network routes - resulting in no internet connection.
Unless you need to use a telnet shell on the device you can safely remove the route - it is not needed for flashing the device. To restore your network connection - remove the route using the ip utility
$ sudo ip route del 172.16.42.0/24
Pinephone data rescue
If an update seemingly bricked your device you can use jumpdrive to rescue data.
Load the jumpdrive and connect to your computer. Then use your file manager to navigate the jumpdrive and copy the desired data onto your computer.
Then flash a new image and you are good to go.
Unstable mountpoints
If you are getting frequent mount/unmount of the device - check your connection points - especially when using the convergence device.
Flashing your pinephone
Flashing from an SD-card is prone to failure. The less error prone method is using the jumpdrive.
System used for this excercise is a cheap yepo laptop
[fh@a116h ~]$ inxi -Sxxx
System:
  Host: a116h Kernel: 5.9.11-2-MANJARO x86_64 bits: 64 compiler: gcc
  v: 10.2.0 Desktop: Xfce 4.14.3 tk: Gtk 3.24.23 info: xfce4-panel wm: xfwm4
  dm: LightDM 1.30.0 Distro: Manjaro Linux
I have no idea if it was/is my sd-card(s) or a limitation of the jumpdrive but I was only able to make it work using a smaller SD-card than the 8GB cards used to test images.
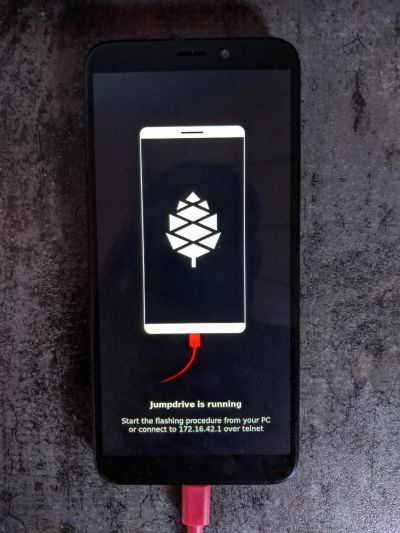
So if you cannot get jumpdrive to work - use a small card - 64MB is enough - I got a 2GB card to work. Remove the back cover and the battery and insert the jumpdrive in the upper slot. Attach the battery - and power on the phone - it will almost immediately display the jumpdrive running image.
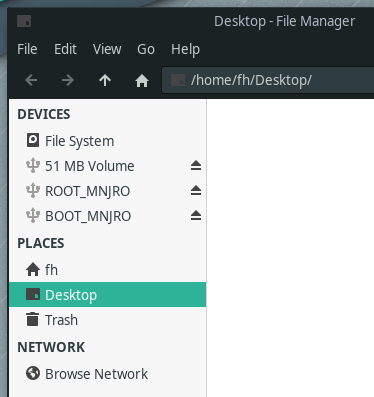
Attach your device to your computer using the red cable. After a few seconds your system will display two new block devices - it could look like this
DETAILS jumpdrive devices ...

and you can verify using the terminal
$ lsblk -o NAME,SIZE,FSTYPE,VENDOR,MODEL
NAME          SIZE FSTYPE VENDOR   MODEL
sda         238,5G        ATA      BORY_R500_256G
├─sda1        100M vfat
└─sda2         16G ext4
sdb          29,1G        JumpDriv e_eMMC
├─sdb1      213,6M vfat
└─sdb2       28,9G ext4
sdc           1,8G        JumpDriv e_microSD
└─sdc1         49M vfat
In the example sdb is the eMMC of the device and sdc is the jumpdrive.
Use dd - ensure your get the $IMAGE and $JUMPDRIVE right
sudo dd if=$IMAGE of=$JUMPDRIVE status=progress bs=4k conv=noerror,fdatasync oflag=dsync
5089054720 bytes (5,1 GB, 4,7 GiB) copied, 1113 s, 4,6 MB/s
1243648+0 records in
1243648+0 records out
5093982208 bytes (5,1 GB, 4,7 GiB) copied, 1115,44 s, 4,6 MB/s
Or use your image writer application select the unpacked image and write it to the jumpdrive eMMC as shown below.
When flashing is done - ensure the data is synced - use the eject button of the file manager.
Remove the cable, battery and jumpdrive. Attach battery, power the device and load the flashed system - the operation effectively resets your phone’s eMMC - no settings survive.
Dowload locations
Updating your pinephone device
You will get notifications - almost daily - with updates. You can of course use the notification to install the updates - but it does not always work that great.
On your desktop using Manjaro - you sometimes have to decide whether to replace or remove a package during update - and the automated installer cannot make those decisions.
I have found that updating the phone using the terminal is better. Setup your preferred mirror using pacman-mirrors and update using pacman e.g.
sudo pacman-mirrors --continent && sudo pacman -Syyu
Convergence unit
This is a great tool - not only for pinephone but also other devices.
I am making use of it connection the device to my LAN using cable, charging and using a wireless Logitec K400 keyboard.
My initial results connection external monitor didn’t work well with Plasma Mobile - I will have to see how it works with Phosh.
Old possibly obsolete thoughts
This topic was created November 2020 - please take this into consideration when reading below.
Phosh vs. Plasma mobile vs. Lomiri
My personal opinion is to keep my phone simple - I don’t use if for social network, mail or anything other than as a phone. I occationally use the browser but that’s all.
So with that in mind - if the basic functionality phone calls in and out and sms works - my needs are satisfied.
The Manjaro Pinephone comes with Phosh beta 1.
If you are in the queue or recently received your pinephone - don’t experiment with getting it up and running using Phosh beta1 - jump right to flashing the phone with the latest beta4.
I started my adventure by flashing Plasma and I think KDE is really great with the Mobile version.
I don’t get along very well with KDE so I turned to Lomiri which is based on UBports which is a fork of Ubuntu Touch - with the thought that I have had hands on an Ubuntu Phone some years ago - and it is decent - device rotation functions very well and functionality is OK.
I then turned to Phosh - which the system was initially loaded with - flashed it and it works very well.
It has a familiar touch - look and feel - and it just keeps getting better - the latest swipe to close apps - really nice.
Plasma Mobile
Currently the Plasma Mobile image has a small peculiarity - but I found a comment elsewhere describing how to fix it - thank you @jjdekroon.
When you switch on the mobile broadband - the DNS resolver is not set accordingly.
I guess it has something to do with how the OS prioritize network - I mean there is no need to use the mobile broadband DNS while connected to WiFi - it would create unnecessary traffic.
Enter the following command in the terminal after disabling WiFi
It will switch back once you re-enable wifi


