Difficulty: ★☆☆☆☆
Why? Who is this for?
Click to expand
If you find your audio on Linux doesn’t have enough of a kick to it, this is probably for you. This guide is made for complete beginners to tuning their audio. (You don’t even need to know how to configure an equalizer.)
Although you could just use a simple equalizer like qpaeq or pulseaudio-equalizer-ladspa
For those of us who want something with a little more options, we have EasyEffects, formerly known as PulseEffects. Which unlike the name suggests, is not that easy, but that’s what this tutorial is here for ![]()
In it’s current state, besides a uniquely highly customizable equalizer, EasyEffects also offers a range of plugins that can enhance audio.
This ranges from sound enhancing effects like Bass Enhancer, Crystalizer, Loudness amplifier, Crossfeed and a whole bunch more, to microphone enhancements like noise reduction and echo cancellation.
In my examples below I will be using EasyEffects which is what I actually have installed, and although the PulseEffect interface may look a little different, it’s all very similar (same buttons, different locations or icons kind of thing).
Install EasyEffects or PulseEffects Legacy
Click to expand
If you’re using PipeWire you’ll want to install EasyEffects
pamac install easyeffects
If you’re using PulseAudio, you will want to install PulseEffects Legacy (or alternatively replace PulseAudio with Pipewire and install EasyEffects instead)
pamac install pulseeffects-legacy
Optional Dependencies/Plugins
For certain features to work, other packages need to be installed to add support for certain plugins (without them some presets may not work)
pamac install calf zam-plugins-lv2 lsp-plugins mda.lv2
There’s also yelp for GTK help prompts
pamac install yelp
What’s the difference?
The short of it is: PulseEffects Legacy is for PulseAudio, EasyEffects is for Pipewire.
The slightly longer version is that after PipeWire became more popular, the developer and maintainer of PulseEffects started working on a PipeWire compatible version of PulseEffects called EasyEffects. This is his main focus right now and he stopped developing & maintaining the original version of PulseEffects, it has since been renamed PulseEffects Legacy and kept available for people who want it in spite of this.
I will henceforth refer to both as EasyEffects unless otherwise specified.
Navigating the interface
Basic Interface
Important Update: Screenshots were taken on an older version of EasyEffects; some elements have been moved around a little, but everything is still there and should be easy to find. Plugins has been renamed to Effects (the plugin (now effect) menu is mostly unchanged)
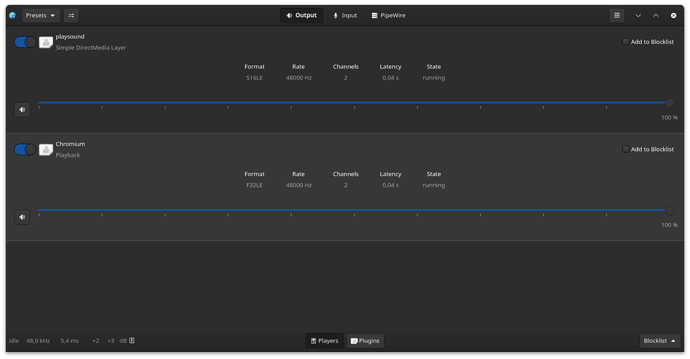
When you first fire up EasyEffects it will look something like this:
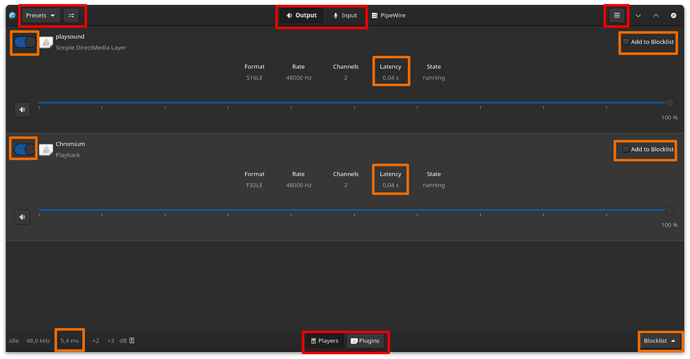
I have highlighted the most important areas in red, and relevant but less important areas in orange for your convenience:
Red Summary:
- Bottom Center is to switch between Playback and Plugin menus, Plugins is where you apply audio effects like the equalizer. Playback is the menu in the image.
- Top Center you can switch between the output and input. Where output is your speakers/headphones and input is your microphone.
- Top Right is where the settings are. This is where you can set the application to dark theme and configure it to autostart on boot if you’d like.
- Top Left you have the
global bypassbutton, when clicked it toggles all plugins on/off so you can quickly test how your sound is with and without enhancements. You also have the presets menu which allows you to create/save/load your plugin presets.
Orange Summary:
- Bottom left we have the latency added by your currently enabled plugins
- On the left side we have a little on/off toggle button for individual audio streams so you can disable EasyEffects for specific audio streams if you want.
- In the middle we have the base latency of each audio stream displayed (0,04s = 40ms)
- On the right side we have add to blocklist button, this means if I never want EasyEffects to apply plugins to a specific program I can just add it to the blocklist. (Be careful though, certain audio streams from different programs may share the same name, for example Chromium and Discord both share the same stream name of Chromium).
- On the bottom right we have the blocklist menu, where you can remove things you’ve added to the blocklist, or manually add things to the blocklist.
Plugin Interface
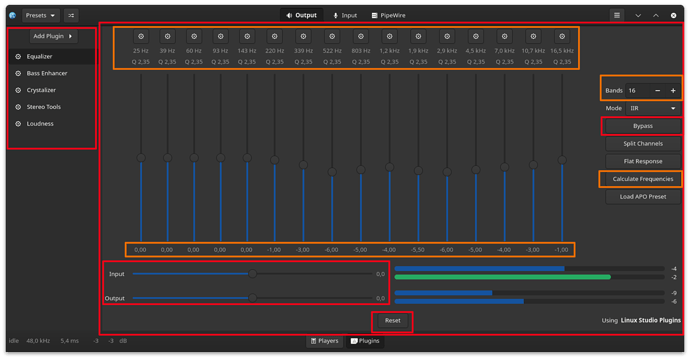
Red Summary:
- On the Left side we have the plugin list, and the ‘Add Plugin’ button, fairly self explanatory. When you first go to this menu it will be empty of plugins but you can, if you’re feeling experimental, hit the Add Plugin button and add an equalizer plugin.
- On the Right side, the big red box is the plugin configuration menu. In this case the plugin being configured is the equalizer.
- Bottom Left area is where you have the preamp options, every plugin has this setting. The primary use for this is to turn down the base volume if you experience clipping (distorted audio due to your headphones not being able to handle too much awesomeness at once)
- Bottom Center we have a reset button. Most plugins have this button, it is self explanatory what it does.
- On the Right side we have a bypass button, unlike the global bypass button in the upper left corner mentioned earlier, this bypass button will only disable the selected plugin but keep all other plugins active, allowing you to toggle just one plugin on/off at a time if you want.
Orange Summary (How the Equalizer works):
- On the Upper Right side we have the bands setting, if you increase this setting you get more sliders to tune. Reduce it you get fewer sliders. Pretty simple.
- In the Top area we can see the frequency for each ‘band’, there is also a button to manually set the frequency for each band. Whenever you change the number of bands, you will probably end up with new bands that don’t have an appropriate frequency, or alternatively you may end up missing bands that have important frequencies.
- On the Mid-Right side we have a calculate frequencies button. This button evenly distributes frequency settings between all your bands. This can be used to fix aforementioned issue of not having the right frequencies per band after changing the total number of bands.
- Finally in the lower area we can see the changes to each band, the number represents by how many decibels you have increased or decreased the volume of the band in question.
If you’re interested, there will be a bit more advice about how to configure an equalizer in another section of this guide.
Download presets so you don’t have to configure it yourself!
Click to expand
One of the selling points of this tutorial is that it doesn’t expect you to be able to configure all these plugins yourself.
And the reason you don’t have to know how to do that is because other people have already done it!
You can download presets from here: Community Presets · wwmm/easyeffects Wiki · GitHub
Recommended starting presets for EasyEffects:
- JackHack96’s EasyEffects Preset Collection, has a bunch of cool options.
- My personal bass boosting preset, if you really like bass.
- Sebastian-De’s ‘Laptop Unsuck’ preset, a great attempt at making laptop speakers sound decent!
- Pchan-5’s Presets, a versatile preset collection
Same set of recommended presets for PulseEffects Legacy :
- JackHack96’s PulseEffects Preset Collection, has a bunch of cool options.
- My personal bass boosting preset, if you really like bass.
- Pchan-5’s Presets, a versatile preset collection
Installing the presets
Instsalling the presets is quite easy, just download the git repo as zip then copy the .json files to
$HOME/.config/easyeffects/output
or
$HOME/.config/pulseeffects/output
depending on which version you have installed. It’s that easy… Almost.
Checking for and fixing broken presets
Sometimes presets will not work right after you install them. As in they will probably mostly work but one plugin in particular may be broken, which would be the convolver.
It’s rather likely that every preset that has a convolver plugin will be broken on install. This is easy to fix though.
To check if there’s a broken preset, run this command:
grep "kernel-path" $HOME/.config/*/output/*.json | sed 's:"k:\n"k:g' | sed 's:",:"\n:g'
It will show you all presets that use a path to direct to a file, typically an IRS file. Tell you the name of the preset file followed by the path used in the file.
You need to check to ensure that the path is correct and leads to the desired file correctly. If it does not, just open the file in question and fix the path.
Activate Preset
Now that you have downloaded and installed your presets and made sure all paths used by them are correctly configured so nothing breaks, it’s time to fire it up and well, that’s the easiest part.
You just press the preset button to open the preset menu in your EasyEffects client and then you just load the preset you want to use, and that’s it, we are done! Everything should be working now.
Configuring Input (Microphone)
So you want noise reduction and echo cancellation? No problem!
(This may not work for PulseEffects Legacy since PulseAudio 15.0; I tried it and the microphone plugin was listed as sink instead of as a source, meaning PulseAudio thought it was a speaker channel, not a microphone one).
Click to expand
- Listen to your mic (if you’re using Discord, this can be done in 'Settings → Voice & Video → Let’s Check; it is not the best way to test this, but it works.)
- Adjust the volume of your microphone in your volume control application. Do not apply any effects yet before you do this. Try to adjust the volume for the best quality (you want it to be low enough to not have too much noise, but high enough that you can be heard properly, this value depends entirely on the mic, for me 40% was the optimal value, some mics might actually need to be boosted instead of having their volume lowered.)
- Hit the ‘Input’ button at the top.
- Hit the ‘Plugins’ button at the bottom.
- Hit the ‘Add Plugin’ button and add noise reduction (No adjustment should be needed, imo the noise reduction plugin provided by EasyEffects is really good.)
- Hit the ‘Add Plugin’ button and add echo cancellation (No adjustment should be needed)
- To test the effectiveness of the echo cancellation, play some music or a video game while listening to your mic. Ideally you owon’t hear it in the recording. Don’t talk while doing this testing, talking will always echo through your speakers at least a little if you are listening to your mic.
- If your microphone is too quiet after adjustments, you can add the Loudness plugin too, set it to 7db and 256 fft size for optimal latency and volume increase.
- Hit the Presets button, then within the Presets menu go to Inputs and name & save your new mic preset!
That’s it for the mic.
Tips
- Go to the program settings and tick the ‘Start Service at Login’ button if you want EasyEffects to autostart with your system.
- Your system may not remember the mic volume settings between reboots, so you might have to manually set it every time or run a script on boot that manually sets it after each reboot.
- Want to learn a bit about equalizers? Read up, the “perfect” equalizer setting described in there btw is really good on high quality headphones and earbuds, not sure how it sounds on speakers though, laptop speakers however will probably never play well with it, they usually need highly specific configurations to sound good.
- When you raise the value of an equalizer band or increase the volume of your bass with the bass enhancer module, it can (is fairly likely to) create an issue called clipping which is talked about in aforementioned equalizer article. This distorts your audio because you’re putting too much stress on your soundcard/listening device by artificially raising the volume of certain aspects of the audio. You need to be aware of this if you plan to experiment with different plugins by yourself. The worst case scenario here is that you blow out your speakers
 so avoid this.
 - The simplest way to prevent clipping is using the preamp (mentioned above) to turn down the volume by preferably the same amount as you increased it for the loudest channel. Presets often don’t reduce the volume enough though which is why you may have to tweak this yourself sometimes.
- An alternative way to prevent clipping, at least with equalizer, is to instead of raising the volume of the bands you want louder, decrease the volume of the bands you don’t want louder (this is exactly what i did in the equalizer shown in the image above
 ) want more bass? Reduce the treble then!
 - If you have had to use the preamp to reduce the volume too much so it gets really quiet even when you configure the volume in your PC to the max, you can use the
Loudnessplugin to raise the volume level of your preset again without as much risk of clipping (not sure how this works, but it does). As a rule of thumb though: Never use the loudness preset to try to make the sound louder than it is without EasyEffects on (e.g. when configuring loudness, always use the bypass and make sure it doesn’t sound louder than the sound does normally). If possible, you want to avoid using this plugin though.
Troubleshooting
Click to expand
-
To replace PulseAudio with PipeWire, run:
pamac remove manjaro-pulse pulseaudio-equalizer pulseaudio-jack pulseaudio-lirc pulseaudio-rtp && pamac install manjaro-pipewire -
To replace PipeWire with PulseAudio, run:
pamac remove manjaro-pipewire && pamac install pulseaudio-bluetooth manjaro-pulse -
To confirm whether you’re running PipeWire or PulseAudio
inxi -AIt should output something like this if you are running PipeWire:
$ inxi -A
Audio:     Device-1: Intel Cannon Lake PCH cAVS driver: snd_hda_intel
           Device-2: NVIDIA TU106 High Definition Audio driver: snd_hda_intel
           Sound Server-1: ALSA v: k5.14.2-1-MANJARO running: yes
           Sound Server-2: PipeWire v: 0.3.35 running: yes
If PulseAudio is listed, like so:
Sound Server-1: PulseAudio v: 16.1 running: yes
Sound Server-2: PipeWire v: 0.3.58 running: yes
You are running PulseAudio, PulseAudio and PipeWire are mutually exclusive, if PulseAudio is installed it always overrides PipeWire!
-
EasyEffects will only work on PipeWire (If PulseAudio is running it will not work!)
-
PulseEffects will only work on PulseAudio
-
Although you can install both EasyEffects and PulseEffects at the same time, you should avoid running both at the same time because one can cause problems for the other if they are both running.
-
If you run into crackling issues on PulseAudio, try running with the environment variable
PULSE_LATENCY_MSEC=60set. -
If you run into crackling issues on PipeWire, try running with the environment variable
PULSE_LATENCY_MSEC=83set; or if that is not enough, try instead withPULSE_LATENCY_MSEC=126set. For a more in-depth troubleshooting guide on PipeWire crackling, read this -
PulseEffects is outdated and no longer being maintained, although someone might fork it and try to keep maintaining it at some point, until then it will gradually break more and more with every passing PulseAudio update.
And that’s everything! If you have anything to add please comment below ![]()


