Difficulty: ★★☆☆☆
This tutorial will teach you how to rip Vinyl LPs in Manjaro but please know that hardware specific adjustments might be needed depending on your hardware.
TLDR
- Adjust
alternate-sample-rateandavoid resamplingin/etc/pulse/daemon.conf - use
alsamixerto control your sound card, - record with
arecordin the terminal. - Import/Edit the output file of
arecordin Audacity. - Use Musicbrainz to add tags,
- Enjoy!
The long version:
The Hardware used in this tutorial:
- Technics SL-23 Record Player
- AT-95ML cartridge and stylus
- Darlington Labs MM-6 phono preamp
- Drop SDAC USB 2.0
- HP xw4600 Workstation with Realtek ALC262 (Creative X-Fi XtremeGamer)
Sound card specs:
– 24-bit Analog-to-Digital conversion of analog inputs at 96khz sample rate
– 24-bit Digital-to-Analog conversion of digital sources at 96khz to analog 7.1 speaker output
– 24-bit Digital-to-Analog conversion of stereo digital sources at 192khz to stereo output
– 16-bit to 24-bit recording sample rates: 8, 11.025, 16, 11.05, 24, 32, 48, and 96khz
The Software used:
- Manjaro Stable XFCE (and it’s base packages)
- Musicbrainz Picard
- Audacity (1:2.4.1-4 Official Repositories)
- Terminal
- ALSA (see below packages)
- alsa-lib
- alsa-utils
- alsa-ucm-conf
- alsa-topology-conf
- alsa-plugins
- alsa-firmware
- alsa-oss
Preface:
Manjaro stable uses PulseAudio to control audio devices and is a great solution for most users. However, as it is configured, it will resample audio above or below it’s default, both in capture and playback. When trying to capture bit perfect audio, it is best to bypass Pulse and record directly from the respective sound card through ALSA. For playback, it’s fine using Pulse audio when it was properly configured to playback without resampling, as it is simpler to configure Pulse so you can listen to the proper sample rate from any source (Audacious, Audacity, Google Chrome, Spotify, etc). Playback is covered in this section.
Recording
To record,
-
bring the RCA output of the phono preamp directly into the input of the sound card connected to the PC.
-
open a terminal and issue the
alsamixercommand. -
From here press F2, then explore the options to show the devices for your system. Of interest are the options
/proc/asound/cards,/proc/asound/devicesand/proc/asound/pcm. -
arecordwill need to know the card and capture device in the formathw:card,deviceso make note for use later. For this tutorial, the correct card, device is found athw:0,0. -
You can read more about ALSA Devices here
-
While still in ALSA mixer press F6 to select the sound card used for recording (In this tutorial HDA Intel is used as an example)
-
Press F4 to show the mixer for the capture devices for the selected card.
- If you have multiple capture devices, ALSA mixer will have multiple controls for these capture devices too and fortunately, these are in order
- To be safe, set this input to 5 to avoid overloading the card before finding out what level would be appropriate for recording.
- Read more about ALSA mixer here.
-
Now that you have the correct input connected and identified in alsamixer, you will be able to prepare to record. Obviously a clean record, stylus etc, are essential.
-
To record, first prepare a list of commands that you can copy and paste to make life easier:
-
To monitor the recording rate of your sound card (
hw:0,0in this example, see above) use:watch -n1 cat /proc/asound/card0/pcm0c/sub0/hw_paramsyou’ll need to adjust
/cardX/pcmXc/subX/for your input in ALSA identified above. For instance, for recording from the second sound card, first capture device (hw:1,0) instead of the internal card, usewatch -n1 cat /proc/asound/card1/pcm0c/sub0/hw_params -
Now to setup the correct command for
arecord. Obviously adjust output directory, file name, recording format and rate to your liking. Optionally adding--duration=1500will terminate recording after 25 minutes. This can be helpful for doing one LP side at a time, particularly if the turntable in use has an auto-return function and the recording is made unsupervised. For this tutorial, to record in stereo at 32bit 96khz to~/Music/myfile.wavthe command looked like:arecord --device=hw:0,0 --format=S32_LE --rate=96000 --channels=2 --vumeter=stereo ~/Music/myfile.wavNote: you may have noticed the sound card in this tutorial doesn’t list support for 32 bit capture, but when the command to record in s24le was issued, it stated the options were s16le or s32le. Obviously it is best to opt for the higher bit depth. It has been have confirmed by another user on another distribution that this same thing has been experienced. Perhaps an ALSA specific bug.)
-
With the correct commands ready, open two terminal windows (in addition to the already open
alsamixerwindow). -
In one terminal issue the command to monitor the capture rate of the soundcard (which will show
closeduntil recording begins) and thearecordcommand above in a separate terminal to start recording. -
Place the needle on the record then monitor the
arecordVU meter and adjust the alsamixer capture (select Capture and use up/down arrows) until it is peaking around 50%. For the LP’s used in this tuturial this was somewhere between 8-10. -
Once the correct level is set in
alsamixer, reset the needle at the beginning of the record. Alternatively, optionally press ctrl C to stop the recording, delete the recorded file in the location specified in thearecordcommand, restart the recording inarecord, then reset the needle at the beginning.Here is a look at the sample workspace during recording:
-
Once both sides of the album have been brought in, issue CTRL C in
arecordto terminate the recording, then move on to import/editing. -
NOTE. There are instances where recording times may be long or require more drive space (Double LP’s, higher sample rates, unattended recording).
arecordwill automatically split any recording above 2.1 gb into a different file, which could require re-recording if in the middle of a track. Best practice is to monitor recording, eliminate long pauses without information, and split double LP’s into separate recording (one .wav file/record).

Playback and Editing
-
To listen and edit the file which was just recorded we need to make some simple changes to Pulse Audio to allow playback without resampling.
-
First open /etc/pulse/daemon.conf in a text editor
sudo mousepad /etc/pulse/daemon.confand find and edit (the edited lines must be uncommented in daemon.conf by removing the semicolon)
;avoid-resampling = falseto
avoid-resampling = trueand:
;alternate-sample-rate = 48000`to
alternate-sample-rate = 96000` -
Match the
alternate-sample-rateto the same sample rate used to record inarecordabove. Some prefer to rip at 192khz, in which case this would be set in thealternate-sample-rate = 192000. For this tutorial, it is set to 96000. -
Once those changes are saved, issue
systemctl --user restart pulseaudioto restart PulseAudio with the changes.
-
Now, to check the changes have stuck, find the file just recorded i.e. ~/Music/myfile.wav and play it with an audio player.
-
While the file is playing issue
pacmd list-sink-inputsCheck the correct bit depth and sample rate are shown, and importantly the
resample methodshowscopyornone, as seen below:[david@david-protools ~]$ pacmd list-sink-inputs 1 sink input(s) available. index: 1 driver: <protocol-native.c> flags: state: RUNNING sink: 0 <alsa_output.usb-Grace_Design_SDAC-B_USB_2.0-00.analog-stereo> volume: front-left: 65536 / 100% / 0.00 dB, front-right: 65536 / 100% / 0.00 dB balance 0.00 muted: no current latency: 494.39 ms requested latency: 460.00 ms *sample spec: float32le 2ch 96000Hz ##input sample rate is correct* channel map: front-left,front-right Stereo *resample method: copy ## no resampling taking place* module: 14 client: 5 <Audacious> properties: media.name = "Audacious" application.name = "Audacious" native-protocol.peer = "UNIX socket client" native-protocol.version = "35" application.process.id = "46445" application.process.user = "david" application.process.host = "david-protools" application.process.binary = "audacious" application.language = "en_US.utf8" window.x11.display = ":0" application.process.machine_id = "675df23d99b8436bb7b9875ef0b74bd4" application.process.session_id = "2" application.icon_name = "audacious" module-stream-restore.id = "sink-input-by-application-name:Audacious" -
This can also be confirmed by monitoring the output of the USB DAC (
hw:2,0) in this tutorial by issuingwatch -n1 cat /proc/asound/card2/pcm0p/sub0/hw_paramsWhere
card2/pcm0p/sub0represented the playback output of my USB DAC in ALSA. Obviously adjust to your hardware.IF you’re showing 44100 sample rate be sure Pulse Volume control is not currently open when checking with above commands. If it is open it will lock the default sample rate defined in daemon.conf file
AUDACITY EDITING
Now Pulse is properly configured to playback without resampling, import the recorded file into Audacity to begin editing.
-
Launch Audacity (a separate workspace can be used to keep things tidy)
-
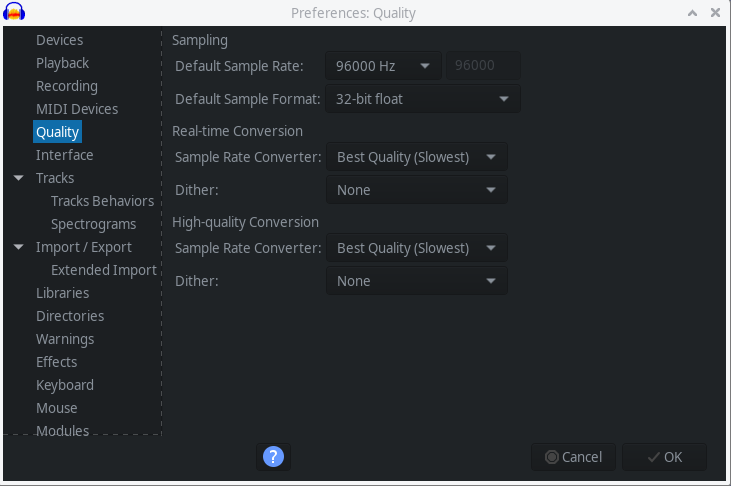
Before importing the file into Audacity some setup is needed to edit at the same bit depth and sample rate as the source material.
-
Navigate to Edit>Preferences and adjust as needed for the recorded file. For this tutorial set to 32bit and 96000hz.
Since the source was in the same bit depth and sample rate, and the output hardware can handle these rates, no resampling should occur. Not a huge deal here, since we are just using this to edit the master file into separate songs and add some basic tags for Musicbrainz to use later.
-
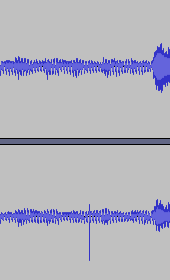
Now go to File>Import>Audio and select the file recorded from the directory used to output from
arecordearlier. i.e .(~/Music/myfile.wav)If done properly, it should import to a single track and all the waveforms should be well below the max 1.0 of the meter on the left hand side of the track. If the waveforms look like a block, the audio was recorded too loud and will add distortion. It is best to have Audacity configured to show clipping (View>Show Clipping) and it can be seen in the below example from this tuturial, where the needle drop on side B registered as red line. You DO NOT want to be seeing these red lines within the waveforms, as the audio has been clipped during recording and will need to be re-recorded with a lower capture volume.
-
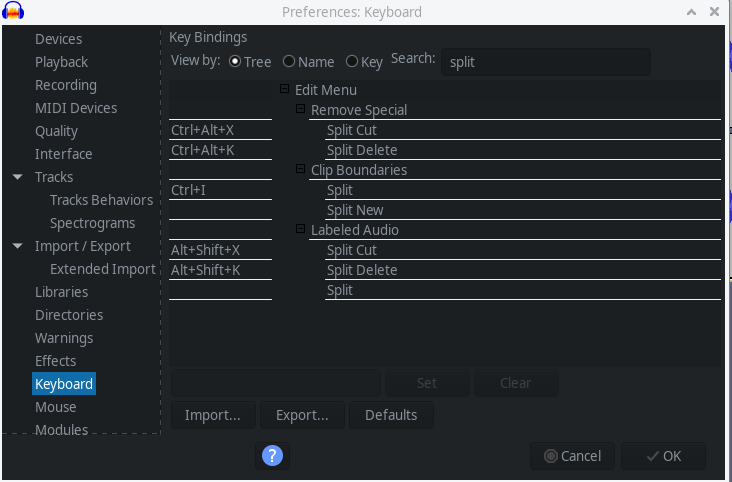
Next, familiarize yourself with the slip tool (EDIT>CLIP BOUNDARIES>SPLIT) and set a keyboard shortcut for Split under (EDIT>PREFERENCES>KEYBOARD).
-
For more information on Audacity Split editing check here
-
Edit the master imported file to remove dead space at the beginning of the record prior to music start, in between record sides, and at the end after the music has stopped. Ensure all needle drops/clipping are removed.
-
Use CTRL A to select all, then CTRL J to join the sections together.
-
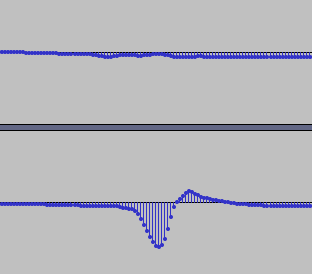
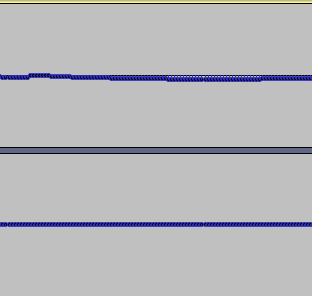
Go through the entire file to isolate clicks and pops and remove them with the pencil tool. Pay extra attention to every tall spike to ensure they are not clicks and pops. See below for examples:
Right Channel Pop
Zoomed for correction
Post Correction
-
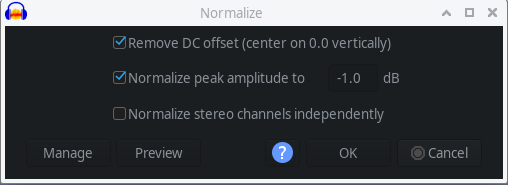
With the entire file now edited and joined, normalization will be used to raise the volume while preserving the song and album dynamics. Choose EFFECT>Normalization and set as below, or to a peak amplitude of your choice. Generally not recommended to go above -0.3 dB.
-
Avoid normalizing channels independently as a pop or crack, or single channel instrument may prevent proper normalization and you’ll get an overloud channel!
-
Avoid using the Effects in Audacity (noise removal, click removal) apart from normalize and the pencil tool to edit out loud pops manually as described above. More about Audacity Effects can be found here
-
The last step before export is to isolate each song. Find the beginning of each track and use the split function to separate. With exception of the first and last song, the end of one track should be the beginning of the next. Continue until all tracks are cut.
-
To Export, highlight each song individually, and use FILE>EXPORT SELECTED AUDIO. Choose FLAC from the bottom right, Level 8 and 24 bit. This returns a 24 bit 96khz flac file. Export to a Folder with the album name to make life easier in MusicBrainz.
-
Fill in the appropriate Tag information on the next window, and move on until they’re all done! (If you’re not getting Metadata information at export check EDIT>Preference>Import/Export>Show Metadata Tags Editor Before Export is checked)


MUSICBRAINZ
Once all the tracks are edited and exported into the correct folder-
-
Open Musicbrainz Picard , choose Add Folder and select the folder with the .flac exports from Audacity.
-
Once the files are in, select Unclustered Files, then press Lookup.
-
Let Musicbrainz do it’s magic and save the new tags.
-
Optionally install a plugin for playlist generator within MusicBrainz and right click on the album, plugins, generate playlist.
More can be found about Musicbrainz Picard here.
Enjoy!
Navigate to your new rip, double click on the playlist and Enjoy! Feel free to run the commands up above to verify you’re getting the correct playback bit depth and sample rate. FWIW, my USB DAC only outputs in 32bit, so my 24bit rips, show playback at 32 bit depth when I playback on my PC. My main reason for ripping my vinyl collection is to listen to them upstairs on my good stereo, which can output 24bit 96khz without issue.
Note 1: Please feel free to share any improvements in the thread below.
Note 2: Please do not turn this thread into a discussion of the merits of digital vs analog, audibility of sample rate etc, etc: this tutorial is all about how to properly record records at a high bit depth and sample rate in Manjaro Stable for those who want to. If you’re happy with your streams or CD’s, more to you, this wouldn’t be the conversation for you. ![]()
[/quote]