Difficulty: ★★☆☆☆
This tutorial will help you set up a pacman mirror using a Synology Diskstation, which will allow you to minimize Internet traffic when deploying to multiple Manjaro Workstations / Servers on your LAN.
1. the docker image:
A small alpine image has been used with rsync and nginx included. The details can be found here on on GitHub
When starting the container, two simple things happen:
-
nginxis started - An
rsyncscript runs in an infinite loop with configurable sleep (default 6 hours)
2.The installation via docker
The installation can be done on a server or on a NAS.
Linux Server
Prerequisites:
-
dockerinstalled on the server - (optional)
docker-composeinstalled on the server - root rights or membership of the docker group
Installation steps with commands
Step 1: Creation of a directory for the package data
mkdir -p /docker-data/manjaro-mirror
Step 2 (Variant 1): Launching the container with docker run
docker run -d \
  --name=manjaro-mirror \
  -p 8080:80 \
  -v /docker-data/manjaro-mirror:/srv/http/manjaro \
  -e SOURCE_MIRROR=rsync://YOUR_COUNTRY_MIRROR \ # omit the line for default
  --restart unless-stopped \
  ghcr.io/twiese99/manjaro-package-mirror
Step 2 (Variant 2): Starting the container with docker-compose
Create a file named docker-compose.yaml with the following content:
---
version: "3.4"
services:
  manjaro-mirror:
    container_name: manjaro-mirror
    image: ghcr.io/twiese99/manjaro-package-mirror
    environment:
      - SOURCE_MIRROR=rsync://YOUR_COUNTRY_MIRROR \ # omit this and the line above for default
    volumes:
      - /docker-data/manjaro-mirror:/srv/http/manjaro
    ports:
      - 8080:80
    restart: unless-stopped
Start the container with:
docker-compose up -d
Synology NAS
Prerequisites:
- docker installed on your nas
- membership of the admin group
Installation steps with links to pictures
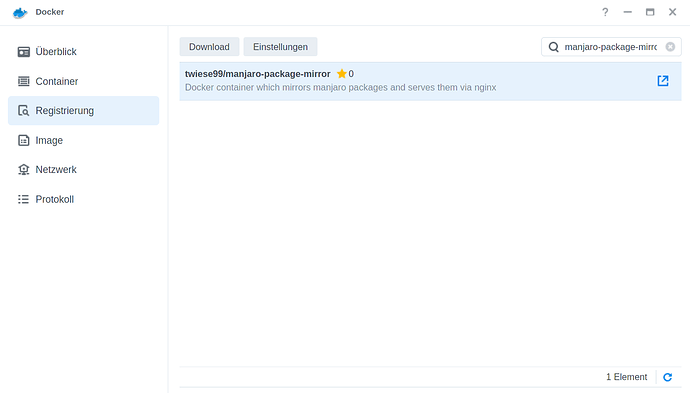
Step 1: Downloading the image
The download of the image is done via the normal interface of the NAS. Simply search for “manjaro-package-mirror” and download the latest version.
Step 2: Starting and configuring the container
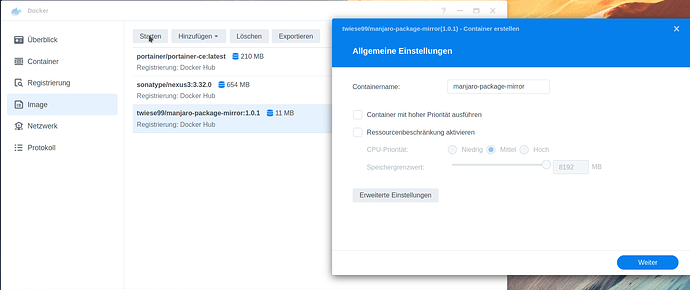
From the menu we now go to “Image” and select the image. Then we click on “Start”. A window should open.
In the window which has opened now, click Advanced settings.
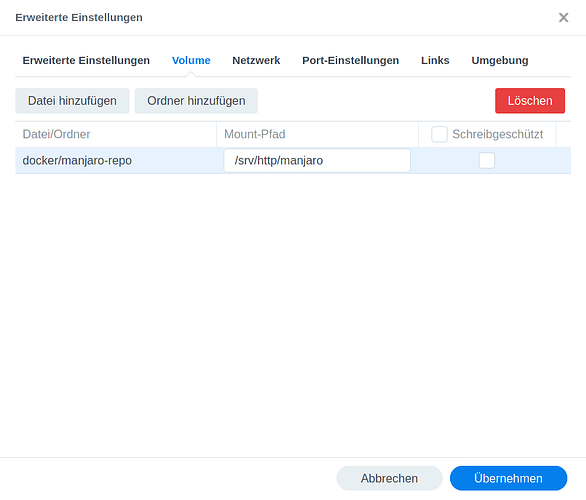
There we select the Volume tab from the bar and click on Add Folder. Now select or create a folder where the packet data of the Manjaro mirror should be located later. As mount path we have to enter /srv/http/manjaro.
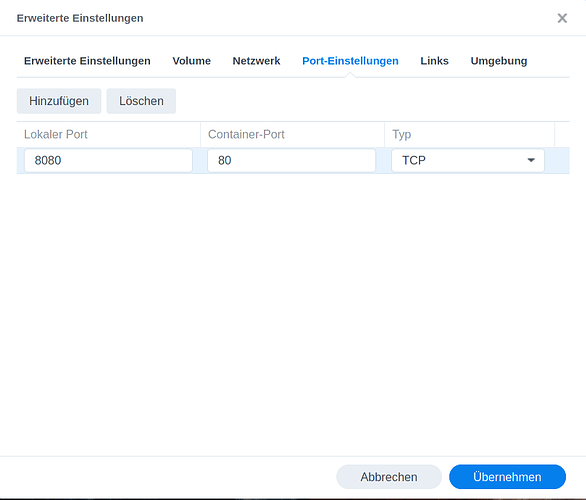
Now go to Port Settings and enter the port you want, e.g. 8080, over which the mirror should be reachable via your NAS IP. Please make sure not to use any reserved or already used ports.
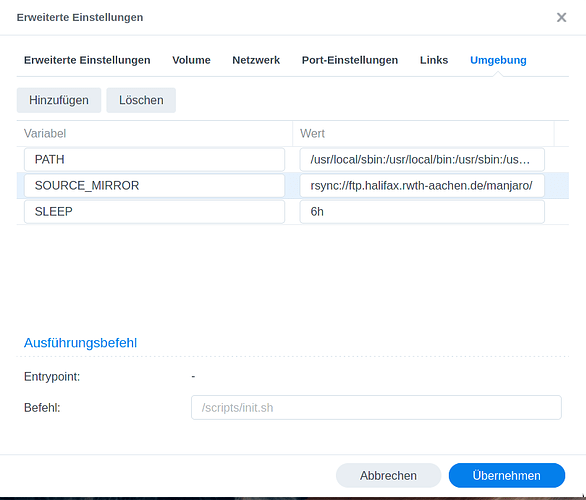
Last but not least, we come to the point “Environment”. I recommend each of you to find out which mirrors in your country (if any) support rsync. By default the container uses the mirror rsync://mirrorservice.org/repo.manjaro.org/repos/. Please change that to a mirror close to you.
If you have found a mirror, you can overwrite the value of the variable SOURCE_MIRROR with its address (please make sure to specify rsync:// as well). Otherwise just leave it at the default settings.
When everything is done click on Apply (the blue button on the bottom right) and start the container.
Conclusion
No matter which variant you choose, you will have a full-fledged Manjaro / pacman mirror running. Please note that the first time you start / sync the container, it may take a while until it starts to create files in the directory. This also depends on which mirror you have chosen for synchronization.
 :
: