How do I setup a graphical or larger text grub for multi-booting Manjaro KDE/Cinnamon/Windows 10?

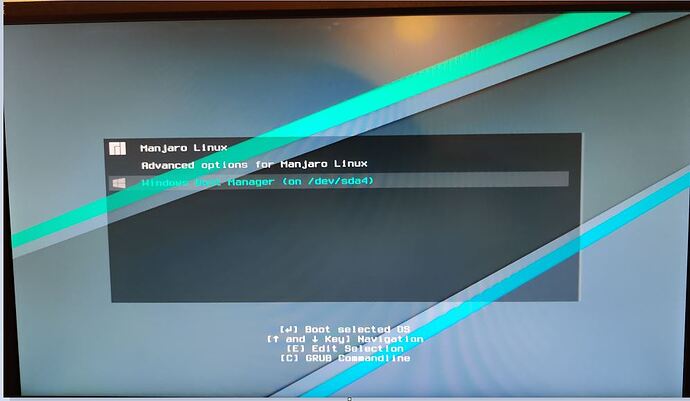
My very old Manjaro install has a graphical or larger text grub menu.

I’m setting up a newer PC to have several installations accessible through multi-boot. How do I get grub to look similar to the above? I don’t believe I made manual changes to the menu when I set up the old system. I need to be able to adjust the text of the labels on the menu entries and the order of the menu entries.

I believe your screenshot is the default look of grub when installed by Manjaro. If you want a simple theme for grub I came across this: https://github.com/mateosss/matter, however in general I believe you will need to edit the config files yourself if you want to change settings.
Also, grub is needed to load your system so DO NOT make changes without understanding what you are doing or being willing to reinstall if it goes wrong.

My reply seems dumb looking at the ones below, well done greg :slight_smile:

I believe your older PC could only do a lower resolution than the new ones.

To change the size of the font

  1. Execute:

    xrandr
    
  2. That command will show you the possible resolutions your monitor supports E.G. for me:

    1920x1080
    and a lot more down to:
    720x400
    

    the smaller the number …the bigger font

  3. edit yout /etc/default/grub by executing:

    sudo nano /etc/default/grub 
    
  4. Look for the line:

    GRUB_GFXMODE=auto
    
  5. Change auto to the resolution you want from the list in #2 above

  6. Save by pressing Ctrl+o and then Enter and then Y to save and overwrite.

  7. Execute

    sudo update-grub
    

Source: https://wiki.archlinux.org/title/GRUB/Tips_and_tricks

Extra notes:

  • Most monitors can do 800x600
  • Do not get excited by trying to set anything higher than 24 bit. E.G. GRUB_GFXMODE=800x600 is just as good as GRUB_GFXMODE=800x600x24
2 Likes

There are ways to change order of grub menu and their labels

I have yet to completely learn markdown as suggested by a moderator, but I regard the level of skills or difficulty to be intermediate or advanced. So Try at own risk

First you need to understand that each kernel update, or update of grub or anything that re-generates the initrd …is likely to require you to refresh any effforts you make below.

Method A Use root powers to manually edit
/boot/grub/grub.cfg

You can not execute

sudo update-grub

as that will re-generate your original grub.cfg

I recommend not using this method unless you make a backup of that file and I assume you know how to boot a live usb/cd to restore that file.

Method B edit using root powers
/etc/grub.d/40_custom

next execute:

sudo update-grub

This will append your new menus to the existing grub.cfg

Optional, you then manually edit with root powers that grub.cfg to remove your (old) menus

Note that you are likely to have to copy and paste from the (old) grub.cfg various lines into your
40_custom file.

With either method, grub can be made to highlight a menu entry which is not the last one used.
grub counts menu entries from zero. Use root powers to edit
/etc/default/grub

Lets pretend you want to highlight the fifth entry counting from the top

Lines to change would be:
GRUB_DEFAULT=saved …becomes GRUB_DEFAULT=4
GRUB_SAVEDEFAULT=true…becomes GRUB_SAVEDEFAULT=false

1 Like

example of 40_custom for W10

So copy your contents from grub.cfg to 40_custom.

I will show you a copy but I have obscured my IDS by the “string” term with a change of grub label.
Note that I am using a msdos MBR not a GPT and no UEFI either YMMV
so copy your contents not mine ok? and I have W10 on drive=2 so trying to show sda4

menuentry ‘W10’ {
insmod part_msdos
insmod ntfs
set root=‘hd0,msdos4’
if [ x$feature_platform_search_hint = xy ]; then
search --no-floppy --fs-uuid --set=root --hint-bios=hd0,msdos4 --hint-efi=hd0,msdos4 --hint-baremetal=ahci1,msdos0 string
else
search --no-floppy --fs-uuid --set=root string
fi
parttool ${root} hidden-
drivemap -s (hd0) ${root}
chainloader +1
}

1 Like

discussion on benefit of fstab labels instead of UUID

Before I show linux example of a 40_custom that uses labels, I need to tell you why they are good vs UUID.

If you have a caddy system where you swap drives in and out…correct unique labels could be an issue…so UUID is the preferrred way.

If you have a tower or a laptop with kind of permanent drives, no swapping in or out, I prefer labels.

Here is what my /etc/fstab looks like. I do not allow Manjaro to filesystem check s4 for personal reasons.

LABEL=s1 / ext4 defaults,noatime 0 1
LABEL=s4 /s4 ext4 users,rw 0 0
LABEL=swap swap swap defaults 0 0
tmpfs /tmp tmpfs defaults,noatime,mode=1777 0 0

to create labels for each partition, best to boot a live usb/cd and then run root command

 sudo e2label /dev/sda1 s1
 e2label /dev/sda1 # will return its new value of s1

Depending on your other partitions you can label them too. e2label does not label swap partitions.
that needs a different command called swaplabel as ref
https://wiki.archlinux.org/title/persistent_block_device_naming

Note that I have never tried to find a tool to label ntfs partitions.

so when you copy and paste your linux menu entry below your W10 entry, althought copy and paste is very good, its not intuitive IMHO. So we have example

menuentry 'microde and distro ’ {
load_video
insmod gzio
insmod part_msdos
insmod ext2
search --set=root --label s1
linux /boot/vmlinuz-4.19.0-6-amd64 root=LABEL=s1 ro quiet splash
initrd /boot/intel.img /boot/initrd.img-4.19.0-6-amd64
}

I will state the obvious, notice how much easier it is to read?
This is from a forum post from a different forum so I have disguised the distro name.

And at risk of scaring you completely :smiley:
Be aware that some people have a separate partition for the boot dir, while I do not.

If /boot is on its own partition lets say s1 and / is on s2 those lines would change to

search --set=root --label s1
linux /boot/vmlinuz-4.19.0-6-amd64 root=LABEL=s2 ro quiet splash

good luck
1 Like

Thank you guys. I will give this a try once the new equipment arrives.

in grub menu type c to enter into command mode ,then type videoinfo then you can see the resolusion ratio that grub will be support. remeber these. type esc key return to menu boot into system.
you can edit the /etc/default/grub file chang the follow options:

# Uncomment to use basic console
#GRUB_TERMINAL_INPUT=console

# Uncomment to disable graphical terminal
#GRUB_TERMINAL_OUTPUT=console //use this is to use text mode.

GRUB_TERMINAL=gfxterm  //this is to use graphical terminal mode.

# The resolution used on graphical terminal
# note that you can use only modes which your graphic card supports via VBE
# you can see them in real GRUB with the command 'videoinfo'
GRUB_GFXMODE=1366x768x32,auto //here is may resolusion to use,you should write yours.

# Uncomment to allow the kernel use the same resolution used by grub
GRUB_GFXPAYLOAD_LINUX=keep

after change save the file, then do update grub file.
#update-grub
reboot ,you’ii see new mode .if you need to change text font size you can edit /usr/share/grub/themes/manjaro/theme.txt file.