Compiling a Linux Driver for my HBA versus SATA Raid under Manjaro

Awesome… copy/paste works for me in this scenario winnie! I’ll make sure to check it works after my next reboot… but considering the time, I should make like a pumpkin and grab some shut-eye :slight_smile:

I did want to ask one question about an earlier teaching though…

I’m thinking that in order to use this command that I would need a hard-copy of the UUID created during the mdadm --create part of the process (assuming I lost access to the original system for some reason)… because in another system I would not have access to my /etc/mdadm.conf, nor would I be able to run mdadm --detail --scan or sudo dumpe2fs /dev/md/Raid1Array | grep UUID on a system that hasn’t seen the RAID array before. Are either of these incorrect assumptions, or is there another command that could retrieve the UUID?

I guess I am also assuming the UUID I want is that of the array, and not something I’d find in $ sudo blkid… hmmm, that 1st UUID is the same on both drives! hmmm… :thinking:

$ sudo blkid
/dev/sdb1: UUID="54abcbfa-cc3f-becd-e4aa-d7e57961912d" UUID_SUB="ff7eafae-8394-68bc-ea44-fdd3de85dc40" LABEL="AM4-x5600-Linux:RAID1Array" TYPE="linux_raid_member" PARTUUID="9dc5e95d-dda4-9945-8d8b-911d5977fbb6"
/dev/sdc1: UUID="54abcbfa-cc3f-becd-e4aa-d7e57961912d" UUID_SUB="2bdb44ab-e43d-4e8a-0441-27838fd9b45f" LABEL="AM4-x5600-Linux:RAID1Array" TYPE="linux_raid_member" PARTUUID="e9b3a16d-df91-cb47-8138-5d97a1466d39"

Oh wait… I think I’m gonna go on a limb and pretend I’m cluing into something you said earlier… although I’m still not sure I understand the differences between the first and third points (device versus “name”)…

I’m thinking the core clue for me is in the initial create… mdadm --create --verbose --level=1 --metadata=1.2 --raid-devices=2 /dev/md/RAID1Array /dev/sdb1 /dev/sdc1… specifically /dev/sdb1 and /dev/sdc1… and so if this line of thought is correct, I could…

  1. lsblk to identify the drives/partitions names on the new system…
    Screenshot_20210727_230355
  2. Then assemble with… sudo mdadm --assemble /dev/md/RAID1Array /dev/sdb1 /dev/sdc1?

EDIT: Hurray! 10 hours after the first $ sudo iotopext4lazyinit is off the list; finally completed!

That was fun! Let’s wipe all your data and do it all over again! :partying_face:


You can use whichever way you want to identify your block devices.

  • Kernel-assigned
    • Located directly under /dev/
    • Familiar naming-scheme
    • Devices: sda, sdb, sdc, nvme0n1, nvme1n1
    • Partitions: sda1, sda2, sda3, sdb1, sdc1, nvme0n1p1, nvme0n1p2, nvme1n1p1
    • While not often, these can change, based on the internal ports the devices are connected to, external ports, what others devices are plugged in, etc
  • Unique ID, based on model and/or serial number
    • Located under /dev/disk/by-id/
    • Symlinks to the actual kernel-assigned names
    • More meaningful, since they usually follow a pattern of recognizable brands and serial numbers
    • Using the device name (without -partX) is the equivalent to using /dev/sda, /dev/sdb, etc…
    • Partitions are appended to the device name with -part1, -part2, -part3, etc.
    • Usually works across different computers
  • Unique ID based on UUID
    • Symlinks to the actual kernel-assigned names
    • Each device, partition, LUKS container, logical volume, assembled array, etc, has its own unique UUID
    • Can be specified with UUID=, or --uuid=, or /dev/disk/by-uuid/, etc, depending on the config or application
    • Works across different computers
    • Individual partition UUIDs found under /dev/disk/by-partuuid/ (not unique globally, only locally on current system)

So any method above works, for example, to assemble an array, specify an fstab entry, check a file-system, unlock and map an encrypted LUKS container, start a volume group (LVM), etc.

The point being, don’t rely on sda, sda1, sdb, sdb1, sdc, sdc1, etc, for longterm use. You can easily use lsblk and /proc/partition to try to identify your block devices, but it doesn’t hurt to look under /dev/disk/by-id/ (or use the UUIDs).

Most tools are pretty “smart” though. I believe mdadm (and LVM) can simply be told to “scan all block devices, find all md (or PV) devices, and assemble from there” without ever having to specify the exact devices needed, as long as you provide identifiable information (“name” or “uuid” of the array or logical volume group).

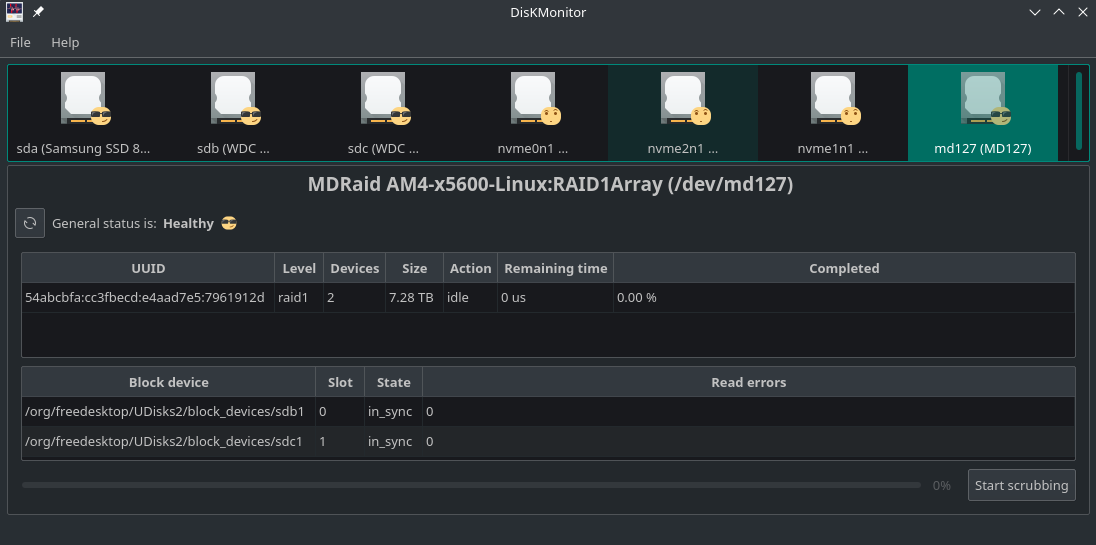
Remember, the UUID for the block devices are a way to specify which devices are needed to build the array, while the UUID for the array itself is akin to its “name”. Once everything is assembled, there’s a new UUID that only exists when the array is assembled, and it is this device where your ext4 file-system lives.

So yeah, you’ve got three sets of UUIDs going on: (1) the UUIDs of partitions that make up your array, (2) the UUID found in the superblock metadata of the array, (3) the UUID of the assembled array that a file-system is formatted on. All three are different and have nothing to do with each other.


EDIT: I highly recommend people get familiar with /dev/disk/by-id/

You’ll notice it “makes more sense” for your physical block devices, as it has the closest hands on naming scheme. (Some devices will be represented two or three different ways.)

Here’s a listing of mine, for example. (I’m leaving out the redundant entries.)

ls -l /dev/disk/by-id/

ata-hp_HLDS_DVDRW_GUD1N_873D2038077 -> ../../sr0

ata-Samsung_SSD_860_EVO_500GB_S8678NE1M67503F -> ../../sda
ata-Samsung_SSD_860_EVO_500GB_S8678NE1M67503F-part1 -> ../../sda1

nvme-SK_hynix_BC501_TGF342GDJGGH-8324A_NZ87645114133054F2 -> ../../nvme0n1
nvme-SK_hynix_BC501_TGF342GDJGGH-8324A_NZ87645114133054F2-part1 -> ../../nvme0n1p1
nvme-SK_hynix_BC501_TGF342GDJGGH-8324A_NZ87645114133054F2-part2 -> ../../nvme0n1p2
nvme-SK_hynix_BC501_TGF342GDJGGH-8324A_NZ87645114133054F2-part3 -> ../../nvme0n1p3
nvme-SK_hynix_BC501_TGF342GDJGGH-8324A_NZ87645114133054F2-part4 -> ../../nvme0n1p4
nvme-SK_hynix_BC501_TGF342GDJGGH-8324A_NZ87645114133054F2-part5 -> ../../nvme0n1p5

Just by looking at the above output, you can get an idea of what type of devices they are (DVD burner, SATA SSD, NVMe m.2) , what brands they are (HP, Samsung, Hynix), and what models they are. (I changed the serial number strings for privacy and warranty-related reasons.)

I can use the above strings instead of /dev/sda, /dev/sda1, /dev/nvme0n1p4, etc, since the symlinks point to the proper kernel-assigned devices, no matter how many times I reboot or change around the order of cables and ports.

However, the UUID is more permanent and is the preferred method, since it’s pretty much a 100% guarantee of never changing, no matter the reboots, no matter relocating to the new computer.

1 Like

:crazy_face: :rofl:
Let’s not and say we did :wink:


Many thanks once again for the in-depth responses winnie!

I’m definitely going to have to spend some time getting acquainted with the core GNU/Linux terminologies so I understand how the OS (and it’s various layers) sees/treats all components/devices and put everything into the right context for myself… I have no doubt that’ll come in time!

/dev/disk/by-id will be definitely be on the top of the list!


By the way, there was quite a few Manjaro updates this morning that required a reboot, which made it the perfect time to test the new udev rule. Things went as expected at first…

$ sudo hdparm -B /dev/sdb

/dev/sdb:
 APM_level      = off

But then I scratched my head…

$ sudo hdparm -S /dev/sdb
  -S: bad/missing standby-interval value (0..255)

… until I realized (after some sleep and additional DDG internet searches) that hdparm was telling me that I had not provided a value for the “set” operation. I had been assuming -S (with no value) was a “get”… and that was incorrect.

According to DDG, the typical recommendation is to use $ sudo -I /dev/sdx (captital “i”) to view the drive settings… although I could not find a “Standby” entry that indicated it was “disabled” (but did for APM)…

Capabilities:
        Standby timer values: spec'd by Standard, no device specific minimum
        Advanced power management level: disabled

… so I’m just going to put some faith in witnessing that the $ sudo hdparm -S0 /dev/sdx “set” command provided proof (that it was setting the value anyway, perhaps not that it had succeeded)…

$ sudo hdparm -S0 /dev/sdc
/dev/sdc:
 setting standby to 0 (off)
$ sudo hdparm -S0 /dev/sdb
/dev/sdb:
 setting standby to 0 (off)

… and trust that the udev rule got the same results (as it did for -B255).

Okay, I started putting together my list of commands for “Raid Scrubbing” and put the following list together for myself based on the Arch RAID Wiki

  • manual scrub start … # echo check > /sys/block/md127/md/sync_action
  • check raid activity for scrub status … $ cat /proc/mdstat
  • stop a running scrub … # echo idle > /sys/block/md127/md/sync_action
  • check if any blocks were flagged bad during scrub … # cat /sys/block/md127/md/mismatch_cnt

This seems like a good start, but I have 2 questions…

  1. What would one do next if bad blocks were found?
  2. Can I automate the scrub start by following the example I found created by TimeShift @ /etc/cron.d/timeshift-hourly by doing the following?
  • $ sudo nano /etc/cron.d/md127-check-monthly
  • paste in the following…
SHELL=/bin/bash
PATH=/usr/local/sbin:/usr/local/bin:/sbin:/bin:/usr/sbin:/usr/bin
MAILTO=""

30 21 1-7 * 6 root echo check > /sys/block/md127/md/sync_action
  • save the file

which if I followed the “Crontab format” correctly should execute on the 1st Saturday of each month at 21:30.

If my automation idea won’t work, I’d love to hear about alternatives… including those with a GUI :wink:

EDIT: And I’d also be interesting in learning about what the last timer is in this list… mdadm-last-resort@md127.timer

$ sudo systemctl list-timers --all
NEXT                        LEFT               LAST                        PASSED            UNIT                          ACTIVATES                      
Thu 2021-07-29 00:00:00 CDT 3h 45min left      Wed 2021-07-28 00:00:18 CDT 20h ago           logrotate.timer               logrotate.service
Thu 2021-07-29 00:00:00 CDT 3h 45min left      Wed 2021-07-28 00:00:18 CDT 20h ago           man-db.timer                  man-db.service
Thu 2021-07-29 00:00:00 CDT 3h 45min left      Wed 2021-07-28 00:00:18 CDT 20h ago           pkgfile-update.timer          pkgfile-update.service
Thu 2021-07-29 00:00:00 CDT 3h 45min left      Wed 2021-07-28 00:00:18 CDT 20h ago           shadow.timer                  shadow.service
Thu 2021-07-29 09:56:35 CDT 13h left           Wed 2021-07-28 09:56:35 CDT 10h ago           systemd-tmpfiles-clean.timer  systemd-tmpfiles-clean.service
Thu 2021-07-29 10:49:53 CDT 14h left           Wed 2021-07-28 07:59:24 CDT 12h ago           updatedb.timer                updatedb.service
Thu 2021-07-29 20:48:44 CDT 24h left           Thu 2021-07-22 22:37:40 CDT 5 days ago        pamac-mirrorlist.timer        pamac-mirrorlist.service
Mon 2021-08-02 00:02:30 CDT 4 days left        Mon 2021-07-26 00:31:02 CDT 2 days ago        fstrim.timer                  fstrim.service
Sat 2021-08-07 15:00:00 CDT 1 week 2 days left Tue 2021-07-13 15:47:16 CDT 2 weeks 1 day ago pamac-cleancache.timer        pamac-cleancache.service
n/a                         n/a                n/a                         n/a               mdadm-last-resort@md127.timer mdadm-last-resort@md127.service

It it were ZFS, repairs happen automatically if using any level of redundancy, due to the all encompassing nature of ZFS itself, checksums on every data record (not just metadata), multiple copies of metadata, and multiple copies of checksums for every record of data dispersed at different areas of the devices. (This is triggered either by a routine scrub or when corruption is detected upon reading data that does not match the checksums.)

From there, you could view the zpool status, see how many checksum errors there were, how many were fixed, and on which physical devices they occurred. It would be up to your discretion on how to proceed:

  • Ignore it and hope it wasn’t too serious?
  • Power down everything then run badblocks and/or SMART tests?
  • To heck with it and just order a replacement drive?
  • Check the status of your backups to decide how to proceed?

mdadm provides redundancy and can tell you if something went wrong, and can even detect corruption. It cannot repair automatically, let alone confidentially determine which device is errant. You can infer which device to offline and replace based on other tests (i.e, badblocks, SMART, etc), and you’d usually be correct.

(Now you see why I’m such a ZFS fanboy? Unfortunately, it’s not “mainstream” enough for me to comfortably use on a desktop distro, and thus I use it exclusively on my NAS server and backups.)


Using systemd over cron seems to be the standard method going forwards. There exists in the AUR a package called raid-check-systemd. Looking through the PKGBUILD and source files, it seems to extract some files from the CentOS mdadm RPM package, and includes a modified systemd timer and service adopted from the previous cron method (from the much older raid-check package.)

After building and installing it, you would edit /etc/conf.d/raid-check to your desired preferences (they explain it within this conf file itself what to change or add.) To modify the schedule, you would edit /usr/lib/systemd/system/raid-check.timer via the command:

sudo systemctl --system edit raid-check.timer
sudo systemctl --system daemon-reload
sudo systemctl --system reenable raid-check.timer

Looks like upon further updates to this package, your changes in /etc/conf.d/raid-check will be backed up, but it doesn’t appear to be the case with raid-check.timer, but I’m not sure about this. Unless your modifications remain preserved in your edit (which I’m assuming you’re only overriding the [Timer] option, such as:

[Timer]
OnCalendar=Sat *-*-1..7 21:30:00

But if your cron method works for you and you’re happy, hey it works. :wink: Up to you!


If it was my system I’d think about disabling it. By all accounts, it reads like some sort of countdown timer to force an array to assemble in a degraded state if a certain number of devices are available. I don’t understand it’s purpose or rationale.

UPDATE: I found another explanation of it, and once again my question is… "But, why?"

No, really… why? I don’t know about you, but I would rather have the array never start in a degraded state on its own, as I would prefer to deal with it myself and figure out why it cannot start in a healthy state. (“Did I forget to plug in a drive? Faulty cable? Wrong names? Defective drive?”)


Looks like a couple of GUI options already exist, might want to check them out:

(Please don’t hurt me.)

1 Like

Thanks again for the reply winnie!

Regarding “automation”… I’ve aborted my cron “hack” for now. I’d like to learn more about using cron/cronie properly… but today isn’t the day :wink: … perhaps when I’m ready I’ll start by installing zeit-git (a cron GUI from AUR) and watch what it does. When I tried following one of the wiki’s yesterday and ran $ sudo crontab -e… I was immediately confused by why nano would have launched with /tmp/crontab.JsvLFQ open… an oddly named file in a temp folder?

And I had found raid-check and raid-check-systemd… but there were some comments I read somewhere that enabling this caused an unusable (or did they say unstable?) system… perhaps it was an old/fixed bug… I didn’t feel like rolling the dice and bypassed them.


I tried to $ sudo systemctl disable mdadm-last-resort@md127.timer… which executed silently, but the timer was still in the list afterwards.

I’m not sure if I’m as worried about this timer with my only array being a mirror… but that could just be a side effect of not really being in my element right now… certain things are still going over my head atm :wink:


Within my old HBA’s monitoring tool I would occasionally see references in the log about a “fixed sector”… but now that I think about it, that likely had nothing to do with scrubbing and more to do with an fsck… oh, and now I am reminded about SMART!

Well I’m glad SMART entered my mind because the Arch SMART wiki let me know KDE has a tool called DisKMonitor that will let me …

  1. monitor/run SMART checks on my disks (minus the nvme that don’t support it)
  2. monitor the health/status of my RAID Array and kick off scrubbing (manually)
  3. receive integrated system notifications (I suspect just of the jobs/checks I run)
  4. and I opted to enable the systray option for it in the “System Tray Settings”

So really the only things it’s missing are fsck and automation… but I like this option!

I think for the time being, I’m going to setup a calendar reminder to…

  1. fsck -r /dev/md/RAID1Array (after umount /data/Raid1)
  2. fire up DisKMonitor to keep an eye on SMART and start/monitor RAID scrubbing

And now that I have the beginnings of some context/understanding about fsck, I went back and edited my /etc/fstab entries so that my drives beyond boot/root have the 6th fsck column set to 2 (instead of 0).

I think I’m in a good place… thanks again for all your patience and advice winnie!

This topic was automatically closed 15 days after the last reply. New replies are no longer allowed.