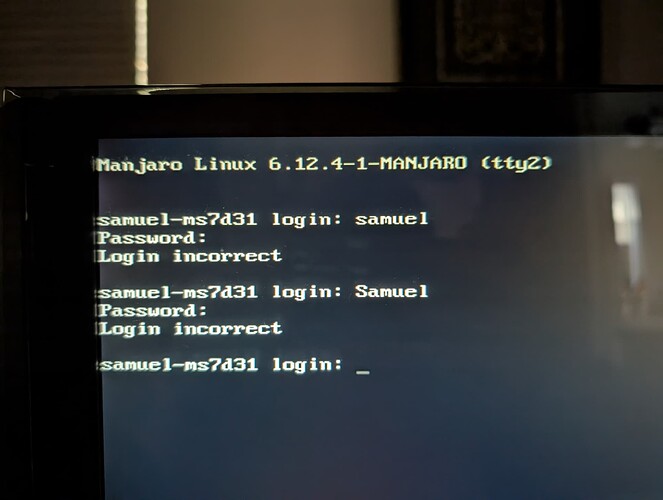
Booting up only leads to tty

Your user account.
The user that is allowed to use sudo to gain admin priviliges.

You can change this users password as root if you can’t remember the password.

passswd yourusername

When I look into my crystal ball … it tells me that this won’t work on your system … :man_shrugging:
although I hope it is wrong in it’s prediction.


Do you now have more than one TTY?

Here is what I mean, this is why I’ve been using root since my password works there but doesn’t work on the one and only account I made it for apparently.

Only conclusion I have left is that sometime and somehow my own account name isn’t spelled out the way I remembered despite seeing it everyday on bootup before the problem happened.

Mod Edit: Fixed quote.

You are logged in - or can log in - as root?

ls /home

this, what you get back as a result of the command, is your username

If you can’t log in with that name because of password failure
you can try to change it to a new one from the root account:

passwd that_username
(you will be asked to set a new password - twice to confirm)

and then try to log in again on a different TTY using that name and the password you just set

… as I said: I suspect it won’t work - but … you apparently didn’t try yet

… user names are lower case always …
CTRL+D logs you out/terminates the session - and you can log in again with the same or a different user name


You didn’t answer the question:

meaning:
can you CTRL+ALT+F3 and CTRL+ALT+F4 … etc.
or just ALT+left arrow or ALT+right arrow
to get to the next/previous TTY ?

Let me highlight a few points that might have been missed:

Your password isn’t displayed as you type; this is a security measure so that others will not see your password. Of course, this also means that you have to be more careful entering a password; I recommend typing slowly in a TTY.

Your login should normally be Username : Password; so, assuming samuel was the user name you configured during install, you would have set it similar to this:

Username Password
samuel whatever-pw1
root whatever-pw2

Or, if you opted to make your User an Administrator, both samuel and root would have the same password:

Username Password
samuel whatever-pw1
root whatever-pw1

This should normally have indicated something was wrong.

And yes, it would work fine because it continued to create an msdos/mbr based Manjaro Installer instead of UEFI.

Yes. Information about Ventoy has already been given, which you so far have not acknowledged at all.

From what I can see, you need to recreate a new Manjaro Installer – whether by using Rufus or (the vastly superior) Ventoy USB method – and make sure it used a GPT partitioning scheme and that it boots as UEFI (both are required).

Pay attention to the settings when creating the Installer.

You will need to reinstall Manjaro to be fully UEFI compliant, which at this point is seems likely not to be.


But first let’s verify whether my presumption is correct. :eyes:

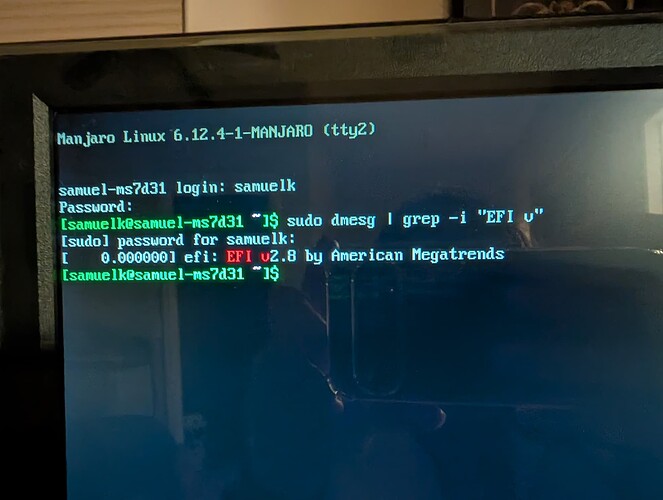
While logged in as root, please provide the output of:

dmesg | grep -i "EFI v"

Or, if you’ve managed to login as your User, use sudo:

sudo dmesg | grep -i "EFI v"

This will tell us if your Manjaro system is UEFI.

Regards.

Forgive me for being too slow here, its the holiday season and I’m figuring out one problem at a time. Yes I got ventoy installed on windows but so far only managed to clear the usb drive since I can’t find the option to select an iso from it so far. the commands you listed here are for using ventoy in manjaro right?

When I have the chance to go back on my PC (I’m typing this on a phone) I will let you know how everything goes.

Yes and I’ll take a picture for proof once I get back on my PC

There was no login prompt at all once booted up, just pitch black until I hit CTRL+ALT+F2 to F5.

I set it as gpt in rufus, the error message shows up, but it made the boot device anyways, In mbr evidently too. I figured at the time it was fine.

I will do these when I can and update you on what happens

I’m certain this was the case when I first setup manjaro. Yes I typed the password slowly too and it still said login incorrect until I used root.

1 Like

The commands given were examples for creating the Ventoy USB (based on how I use it) - one example for UEFI and another for Legacy boot. These are for creating the Ventoy USB in Linux.

Mentioned also is that there is a Windows command line version (commands would be similar, but do your own research as I don’t have that information available) and also a Windows GUI version (again, find it and learn how to use it; study the options carefully).

Which Ventoy? GUI or CLI?

Next you should create the Ventoy USB.

Part of the creation process installs the Ventoy system (basically, the $ESP with the Ventoy boot files) to the USB.

Well, let’s assume that you created it properly, with a GPT partition table and UEFI; and that you have written the Ventoy system to the USB. Check with the documentation if needed.

Now, you need to drag whatever ISOs you wish to use to the Ventoy USB, and then boot the Ventoy USB.

If Manjaro Grub or Windows boots, then you might not have selected the Ventoy USB properly during boot.

If all goes well, whatever ISOs you have dragged onto the main Ventoy USB folder should be listed and selectable when you boot the Ventoy USB.

(A) When you select the listed Manjaro ISO the Manjaro Installer will then boot from the Ventoy USB, and begin Manjaro installation.

(B) Instead of installing, you can also just boot to the Live environment of the ISO (via Ventoy) which allows to perform updates (via chroot) and other repairs (while booting purely UEFI).

Keep your eye open for any indication at the top of the Manjaro Installer (Calamares) screens - it will show whether you’re booting/installing as UEFI or Legacy.

So, that means yes, you can login as root (via TTY).

It’s unfortunate, but the two technologies are not very compatible when it comes to booting. Don’t scold yourself too much; many newer users (and even some long time computer users) seem oblivious to the differences.

Fair enough.

Take extra care this time around, just in case. :wink:

This is funny, my administrator account has been labeled as “samuelk” this whole time. It is the only one outside of root that “recognizes” my password lol. At least that problem is solved.


Now I tested both booting from MBR and UEFI (when rebooting the pc from windows) and the results show this.

Earlier I tried to get a journal log through tty but of course I can’t copy the whole text since I have no browser to send it to in TTY. If I boot up from a USB installer and use “journlactl -b” would it display the same results as when in TTY?

I couldn’t tell, it just said windows version. I would assume its a GUI version. I’ll have to figure out getting the manjaro iso installed through ventoy later since I still didn’t have much time to work on this.

Now that you can login with your User account, it should be easy enough to create a Ventoy USB using the Linux instructions above; it should take no more than a few minutes.

(Make sure it’s the UEFI variety)

Then, you can drag/copy the ISO(s) to the Ventoy USB from Windows (or any OS) if you like…

A workaround for that is to pipe the output to a text file; for example:

journalctl -b > journal-output.txt

Mode edit:- Corrected typo in example.

Assuming the command is run from your home directory, the file will be created as ~/journal-output.txt and will contain the output. This works for most commands; even when performing an update:

sudo pacman -Syu > update-attempt-1.txt

The update is performed and all output is captured to text.

See how important taking notes can be? :smile_cat:

Let us know when you’re able to boot with the new Ventoy USB and launch the Manjaro Installer. From that point, Members can more easily guide you on what to do next.

Regards.

I was able to boot into the ventoy created manjaro installer, and I am currently using firefox to update you from here. Nothing happened when I tried both of these commands despite one of them asking for permission to install.

The same happened when I was only accessing TTY before using the Ventoy-created installer.

~  journlactl -b > jounal-output.txt                                                                                                                                                          ✔ 
zsh: correct 'journlactl' to 'journalctl' [nyae]? n
zsh: command not found: journlactl
    ~  journalctl -b > journal-output.txt                                                                                                                                                     127 ✘ 
    ~                                                                                                                                                                                             ✔ 
    ~                                                                                                                                                                                             ✔ 
    ~                                                                                                                                                                                             ✔ 
    ~                                                                                                                                                                                             ✔ 
    ~                                                                                                                                                                                             ✔ 
    ~  sudo pacman -Syu > update-attempt-1.txt                                                                                                                                                    ✔ 


:: Proceed with installation? [Y/n] y
    ~                                                                                                                                                                                     ✔  53s  
    ~                                                                                                                                                                                             ✔ 

in the meantime, I also used “sudo blkid” and it resulted in this:

sudo blkid                                                                                                                                                                                 ✔ 
/dev/loop1: BLOCK_SIZE="262144" TYPE="squashfs"
/dev/nvme0n1p3: BLOCK_SIZE="512" UUID="80C2DDCEC2DDC914" TYPE="ntfs" PARTLABEL="Basic data partition" PARTUUID="6f022930-27e1-423d-acd1-b7348da69e22"
/dev/nvme0n1p1: UUID="92DC-90BC" BLOCK_SIZE="512" TYPE="vfat" PARTLABEL="EFI system partition" PARTUUID="3f60fa52-9ccc-4834-a3a3-0ffa8d3c27d1"
/dev/nvme0n1p4: BLOCK_SIZE="512" UUID="F8AC5BC3AC5B7AD8" TYPE="ntfs" PARTUUID="2bd56724-f50f-40c0-841d-c9b5ce376276"
/dev/nvme0n1p2: PARTLABEL="Microsoft reserved partition" PARTUUID="cd43f512-b39d-488c-88cf-b3edd1e7c4e6"
/dev/sdd2: SEC_TYPE="msdos" LABEL_FATBOOT="VTOYEFI" LABEL="VTOYEFI" UUID="223C-F3F8" BLOCK_SIZE="512" TYPE="vfat" PARTLABEL="VTOYEFI" PARTUUID="06803afb-38d2-41dd-b688-57b218841b90"
/dev/sdd1: LABEL="Ventoy" UUID="4E21-0000" BLOCK_SIZE="512" TYPE="exfat" PARTLABEL="Ventoy" PARTUUID="0c0ab50a-5b0d-462c-bfee-1065f8ef01c2"
/dev/sdb2: UUID="460a1205-2a14-44f4-aa4c-c94627e6f576" BLOCK_SIZE="4096" TYPE="ext4" PARTLABEL="root" PARTUUID="3ecdc426-002b-4948-8721-37a52c4962f2"
/dev/sdb1: UUID="36BE-DB6F" BLOCK_SIZE="512" TYPE="vfat" PARTUUID="11af593f-4430-4df5-aacf-a23124f80e34"
/dev/loop2: BLOCK_SIZE="262144" TYPE="squashfs"
/dev/loop0: BLOCK_SIZE="262144" TYPE="squashfs"
/dev/mapper/ventoy: BLOCK_SIZE="2048" UUID="2024-12-16-11-21-39-00" LABEL="MANJARO_KDE_2421" TYPE="iso9660" PTTYPE="dos"
/dev/nvme1n1p2: BLOCK_SIZE="512" UUID="8024AB3924AB3158" TYPE="ntfs" PARTLABEL="Basic data partition" PARTUUID="367cbe8f-942c-43bb-949e-12407f5affc3"
/dev/nvme1n1p1: PARTLABEL="Microsoft reserved partition" PARTUUID="521e5fdd-5877-415f-b34d-448039abb4eb"
/dev/sda2: BLOCK_SIZE="512" UUID="841499DC1499D192" TYPE="ntfs" PARTLABEL="Basic data partition" PARTUUID="51f61711-c567-4218-8e7c-e3a94db08aab"
/dev/sda1: PARTLABEL="Microsoft reserved partition" PARTUUID="a5c040ec-1a62-4557-a551-4991de555e0e"
/dev/loop3: BLOCK_SIZE="262144" TYPE="squashfs"

Is this only showing the results from the installer media? Should I use this in the main drive instead?

Wait nevermind, I manually found the txt files by looking through the folders of the root drive while on the installer. Good to know that it seems all the data are intact.

I can’t upload the journal-output text here because it is passed the characters limit per post.
I can post the update-attmempt-1 here though:

:: Synchronizing package databases...
 core downloading...
 extra downloading...
 multilib downloading...
:: Starting full system upgrade...
resolving dependencies...
looking for conflicting packages...

Packages (1) manjaro-application-utility-1.3.3-13

Total Download Size:   0.06 MiB
Total Installed Size:  0.23 MiB
Net Upgrade Size:      0.00 MiB

:: Retrieving packages...
 manjaro-application-utility-1.3.3-13-any downloading...
checking keyring...
checking package integrity...
loading package files...
checking for file conflicts...
checking available disk space...
:: Running pre-transaction hooks...
(1/1) Creating Timeshift snapshot before upgrade...
==> skipping timeshift-autosnap due skipRsyncAutosnap in /etc/timeshift-autosnap.conf set to TRUE.
:: Processing package changes...
upgrading manjaro-application-utility...
:: Running post-transaction hooks...
(1/2) Arming ConditionNeedsUpdate...
(2/2) Refreshing PackageKit...

Did you not see that those commands were examples?

The second example was to illustrate that the same can be done when performing an update; the update will complete and also write the command output to the text file.

Look in your ~/ directory; the files should be there.

:+1:

1. When using those command examples from the Manjaro Live terminal the files cannot be written to the Live environment’s ~/ directory as it’s read-only.

2. You should have verified that my command was correct – as it turns out I’d made a clumsy typo (apologies, now corrected) and you blindly copied/pasted the example. That was guaranteed not to work. :smile_cat:

Later, you might be asked to enter a chroot environment to perform some maintenance, but the blkid output is displaying the expected information for now.

It looks like you’re missing much of the output.

Nevermind; this might not be neeeded (and remember, the commands were only examples).


From this point, you might have some success with the following Tutorial;

Note: The tutorial also contains instructions for those using a BTRFS filesystem – this is not you – please be extremely careful with that tutorial and do not blindly copy/paste commands that are not specifically needed for your system; :eyes:

It’s a tutorial, not a list of step-by-step instructions.


If this fails to bring any joy, one of the few remaining options will be a complete reinstallation of Manjaro.

Regards.

3 Likes

I finally found time to start working on this but here are some things I wanted to confirm with you first before proceeding to the next step. (sudo su -) has listed this:

sudo su -                                                                                      ✔ 
[manjaro ~]# lsblk --fs
NAME      FSTYPE   FSVER     LABEL            UUID                                 FSAVAIL FSUSE% MOUNTPOINTS
loop0     squashfs 4.0                                                                   0   100% /run/miso/sfs/livefs
loop1     squashfs 4.0                                                                   0   100% /run/miso/sfs/mhwdfs
loop2     squashfs 4.0                                                                   0   100% /run/miso/sfs/desktopfs
loop3     squashfs 4.0                                                                   0   100% /run/miso/sfs/rootfs
sda                                                                                               
├─sda1                                                                                            
└─sda2    ntfs                                841499DC1499D192                                    
sdb                                                                                               
├─sdb1    vfat     FAT32                      36BE-DB6F                                           
└─sdb2    ext4     1.0                        460a1205-2a14-44f4-aa4c-c94627e6f576                
sdc                                                                                               
└─sdc1    exfat    1.0       SanDisk SSD      D8EA-2429                                           
sdd                                                                                               
├─sdd1    exfat    1.0       Ventoy           4E21-0000                                           
│ └─ventoy
│         iso9660  Joliet Ex MANJARO_KDE_2421 2024-12-16-11-21-39-00                     0   100% /run/miso/bootmnt
└─sdd2    vfat     FAT16     VTOYEFI          223C-F3F8                                           
nvme1n1                                                                                           
├─nvme1n1p1
│         vfat     FAT32                      92DC-90BC                                           
├─nvme1n1p2
│                                                                                                 
├─nvme1n1p3
│         ntfs                                80C2DDCEC2DDC914                                    
└─nvme1n1p4
          ntfs                                F8AC5BC3AC5B7AD8                                    
nvme0n1                                                                                           
├─nvme0n1p1
│                                                                                                 
└─nvme0n1p2
          ntfs                                8024AB3924AB3158  

The guide you sent is going off the assumption that my Manjaro drive natively boots from UEFI, which we both found is not the case here. Now (sudo su -) does list an ext4 drive but it’s under sdb instead of sda (while the sda only says ntfs) which the guide says is supposed to be where the root and efi system are located. Does this mean that my root and efi partitions are located in the wrong place this whole time?

That is just this one particular guide.

manjaro-chroot works with non-UEFI systems just as well

However - you appear to have, on /dev/sdb in your output, a system that was installed in UEFI mode - it has got an vfat partition and an ext4 partition

… one of the reasons one should not rely on device names like /dev/sda... or /dev/sdb... but rather on the UUID of the device or partition is that this order can change, is not stable across reboots.
It mostly stays - but no guarantee.

No.

1 Like

very well then, at least it’s the only drive labelled with the UUID format. Since the other drives are either the USB boot or unmounted drives, I’m assuming they don’t have their UUID displayed right?

It’s not the only one.

From looking at your other output of blkid further up,
these without a UUID seem to be

sda1 corresponds to -->

/dev/sda1: PARTLABEL="Microsoft reserved partition" PARTUUID="a5c040ec-1a62-4557-a551-4991de555e0e"

nvme0n1p1 corresponds to -->

/dev/nvme0n1p1: UUID="92DC-90BC" BLOCK_SIZE="512" TYPE="vfat" PARTLABEL="EFI system partition" PARTUUID="3f60fa52-9ccc-4834-a3a3-0ffa8d3c27d1"

nvme1n1p2 corresponds to --> ... nothing that I can see

one Microsoft partition,
one additional EFI partition on an SSD
and one that I can’t place

… I don’t know why some are not displayed - easy to check whether the cause is them not being mounted - by mounting them and running the command again.

But I guess your only interest here is /dev/sdb with the ext4 partition (and an EFI partition) on it.

I recommend disconnecting all disks apart from the Ventoy USB and the disk to work on.

As mentioned earlier, there is no guarantee this will produce results, and you might still need to perform a complete reinstall; but, let’s see how it transpires.

Before you start, output of sudo lsblk --fs and sudo blkid might be handy for reference later.

I find, sudo is not necessary with lsblk, and

lsblk -o PARTUUID,KNAME,PTTYPE,TYPE,FSTYPE,SIZE,PARTTYPENAME,UUID,MOUNTPOINT,PARTLABEL,label 

is much more informative :wink: , as it gives PARTUUID and UUID, Partitiontyp and type of the partitiontable itself, also “both” Labels :footprints:

1 Like

Looks like you were right, I took out all external and the windows drive and now the same linux drive is labelled as “sda” now:

 sudo lsblk --fs                                                                                ✔ 
NAME    FSTYPE  FSVER   LABEL            UUID                                 FSAVAIL FSUSE% MOUNTPOINTS
loop0   squashf 4.0                                                                 0   100% /run/miso/sfs/livefs
loop1   squashf 4.0                                                                 0   100% /run/miso/sfs/mhwdfs
loop2   squashf 4.0                                                                 0   100% /run/miso/sfs/desktopfs
loop3   squashf 4.0                                                                 0   100% /run/miso/sfs/rootfs
sda                                                                                          
├─sda1  vfat    FAT32                    36BE-DB6F                                           
└─sda2  ext4    1.0                      460a1205-2a14-44f4-aa4c-c94627e6f576                
sdb                                                                                          
├─sdb1  exfat   1.0     Ventoy           4E21-0000                                           
│ └─ventoy
│       iso9660 Joliet  MANJARO_KDE_2421 2024-12-16-11-

Here’s what blkid listed so far, anything off so far?

sudo blkid                                                                                     ✔ 
/dev/loop1: BLOCK_SIZE="262144" TYPE="squashfs"
/dev/sdb2: SEC_TYPE="msdos" LABEL_FATBOOT="VTOYEFI" LABEL="VTOYEFI" UUID="223C-F3F8" BLOCK_SIZE="512" TYPE="vfat" PARTLABEL="VTOYEFI" PARTUUID="06803afb-38d2-41dd-b688-57b218841b90"
/dev/sdb1: LABEL="Ventoy" UUID="4E21-0000" BLOCK_SIZE="512" TYPE="exfat" PARTLABEL="Ventoy" PARTUUID="0c0ab50a-5b0d-462c-bfee-1065f8ef01c2"
/dev/loop2: BLOCK_SIZE="262144" TYPE="squashfs"
/dev/loop0: BLOCK_SIZE="262144" TYPE="squashfs"
/dev/mapper/ventoy: BLOCK_SIZE="2048" UUID="2024-12-16-11-21-39-00" LABEL="MANJARO_KDE_2421" TYPE="iso9660" PTTYPE="dos"
/dev/sda2: UUID="460a1205-2a14-44f4-aa4c-c94627e6f576" BLOCK_SIZE="4096" TYPE="ext4" PARTLABEL="root" PARTUUID="3ecdc426-002b-4948-8721-37a52c4962f2"
/dev/sda1: UUID="36BE-DB6F" BLOCK_SIZE="512" TYPE="vfat" PARTUUID="11af593f-4430-4df5-aacf-a23124f80e34"
/dev/loop3: BLOCK_SIZE="262144" TYPE="squashfs"

I do have an nvme drive with no OS installed designed for storage / video recording or any other task that is suitable for high transfer speeds. It’s probably that one, no coincidence that it doesn’t show up the second time running (lsblk) after removing it.

Well here goes:

PARTUUID                             KNAME PTTYPE TYPE FSTYPE   SIZE PARTTYPENAME         UUID                                 MOUNTPOINT PARTLABEL LABEL
                                     loop0        loop squash  90.1M                                                           /run/miso/           
                                     loop1        loop squash   1.1G                                                           /run/miso/           
                                     loop2        loop squash   1.8G                                                           /run/miso/           
                                     loop3        loop squash 858.9M                                                           /run/miso/           
                                     sda   gpt    disk          1.8T                                                                                
11af593f-4430-4df5-aacf-a23124f80e34 sda1  gpt    part vfat     300M EFI System           36BE-DB6F                                                 
3ecdc426-002b-4948-8721-37a52c4962f2 sda2  gpt    part ext4     1.8T Linux filesystem     460a1205-2a14-44f4-aa4c-c94627e6f576            root      
                                     sdb   gpt    disk         59.8G                                                                                
0c0ab50a-5b0d-462c-bfee-1065f8ef01c2 sdb1  gpt    part exfat   59.7G Microsoft basic data 4E21-0000                                       Ventoy    Ventoy
06803afb-38d2-41dd-b688-57b218841b90 sdb2  gpt    part vfat      32M Microsoft basic data 223C-F3F8                                       VTOYEFI   VTOYEFI
                                     dm-0  dos    dm   iso966     4G                      2024-12-16-11-21-39-00               /run/miso/           MANJARO_KDE_2421

The Manjaro disk is showing that it’s UEFI/GPT, and the Ventoy USB, likewise. It’s looking good.

It might be wise to again make sure CSM/Legacy is disabled in BIOS, at least while performing any recovery and maintenance.

You should now be able to boot to the Manjaro Live environment on the USB and follow the directions in the aforementioned tutorial.

With any luck that might help recover the installation.

Regards.

1 Like

I made sure CSM was disabled as well as applying the other tips you mentioned, I followed the guide on all the rather simple instructions for ext4. Assuming (chroot) was as simple as typing in the command for ext4, the problem isn’t solved.

HOWEVER, I just found this “guide”.
https://askubuntu.com/questions/1450277/ubuntu-22-04-booting-into-tty-only
https://askubuntu.com/questions/1432449/how-to-install-amd-gpu-drivers-ubuntu-22-04-lts/1432539#1432539
Yes, it’s for Ubuntu and AMD drivers however the situation seems very identical to what I’m having.

From what I gather from here, the problem isn’t a damaged kernel, damaged bootup, nor is it a damaged desktop manager but rather damaged graphical drivers.

I know Manjaro is strict with installing drivers outside of the repositories but since I only have access to TTY and no software manager, how should I access and reinstall Nvidia drivers through sudo in TTY?